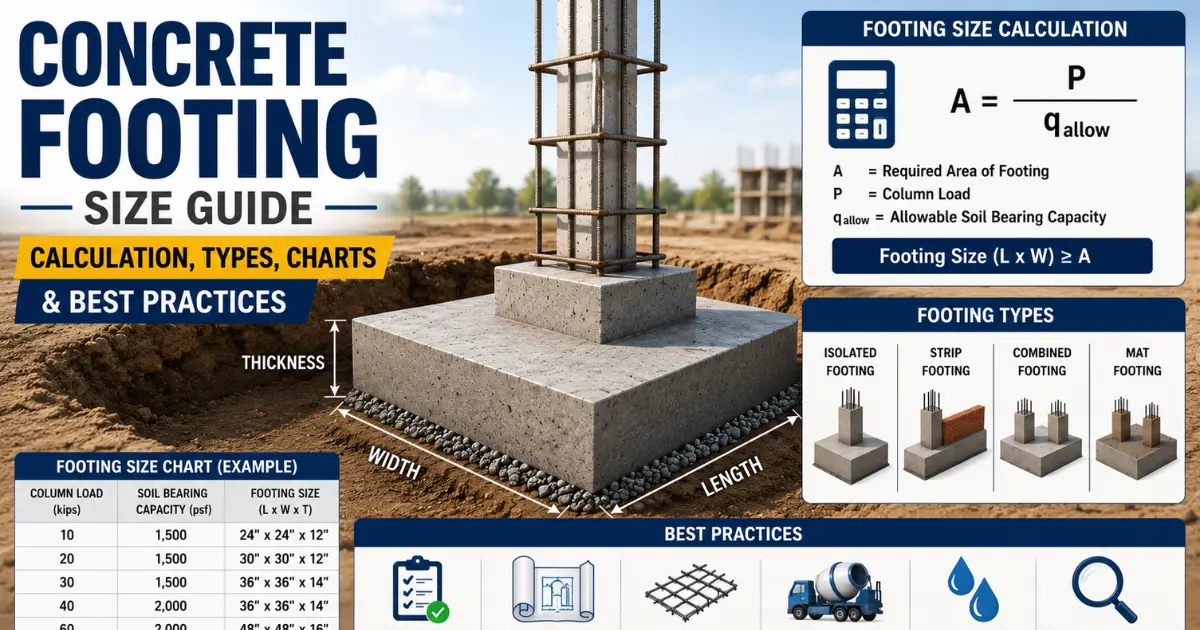
Concrete Footing Size Guide: Calculation, Types, Charts & Best Practices

Concrete Footing Size Guide: Calculation, Types, Charts & Best Practices

The strength of any building depends on its Foundation, and the most important part of the Foundation is the Concrete Footing. The job of the Footing is to distribute the entire load (Load) of the building evenly on the ground, so that the structure remains safe and stable for a long time. If the Size of the Footing is not chosen correctly, the strength of the entire building can be affected. Concrete Calculator
An incorrectly sized Footing can cause many serious problems. With a very small Footing, more pressure falls on the ground, which can lead to Foundation Settling, Cracks in walls and slabs, and in serious cases Structural Failure. On the other hand, making a Footing larger than necessary increases the unnecessary consumption of Concrete and Steel, which also increases the construction cost.
In this Concrete Footing Size Guide, you will learn on which Factors the correct Size of the Footing depends, such as Building Load, Soil Bearing Capacity, and Soil Type. Along with this, you will learn an easy way to do Footing Size Calculation, Standard Footing Size Charts, Practical Examples, and such important Tips with the help of which you will be able to select the correct and safe Footing Size for your construction work.

Footing Types (Types of Footings)

In construction work, different types of Footings are used according to different types of buildings, soil conditions, and loads. Below are the most commonly used Footing Types.

1. Strip / Wall Footing

Strip Footing is mainly used below Load Bearing Walls. It is made continuously along the entire length of the wall so that the load of the wall can be distributed evenly on the ground. Online Concrete Calculator
Main Features:

  • Suitable for Load Bearing Walls.
  • Distributes the entire Wall Load evenly.
  • It is used more in small houses and low-rise buildings.
  • Construction is relatively easy and economical.

2. Isolated / Pad Footing

Isolated Footing is also called Single Column Footing. It is made separately under each Column and is most commonly used in RCC Frame Structures.
Main Features:

  • Used for Individual Columns.
  • Can be made in Square, Rectangular, or Circular shapes.
  • Most suitable in soil with good Bearing Capacity.
  • Commonly used in Residential and Commercial Buildings.

3. Raft / Mat Foundation

Raft Foundation is made as a large Reinforced Concrete Slab under the entire building. It is used when the Bearing Capacity of the soil is low or there are too many Columns.
Main Features:

  • Spreads the entire Building Load over a large Area.
  • Suitable for Soft Soil.
  • Reduces Differential Settlement.
  • More commonly used in High-rise and Heavy Structures.

4. Combined Footing

In Combined Footing, two or more Columns are supported on the same Footing. It is used when Columns are very close to each other or it is not possible to make separate Footings due to Property Boundary.
Main Features:

  • Supports two or more Columns.
  • Useful when space is limited.
  • Distributes the Load in a balanced manner.
  • Ideal for Columns built near the Boundary Line.

5. Pile Footing

Pile Footing is used when the upper soil is weak and the strong Soil Layer is present at considerable depth. In this, Concrete or Steel Piles are driven deep into the ground and a Pile Cap is made on them.
Main Features:

  • Most effective in Weak Soil.
  • Suitable for Heavy Buildings, Bridges, and Industrial Structures.
  • Transfers Load to deep strong Soil.
  • Reduces the risk of Settlement.

6. Stepped Footing

Stepped Footing is used on sloped ground. In this, the Footing is made in a step shape so that the construction remains stable and proper support is obtained according to the slope of the ground.
Main Features:

  • Designed for Sloping Ground.
  • Makes Excavation easier.
  • Increases the Stability of the Foundation.
  • More commonly used in Hillside and Uneven Terrain areas.

Factors Affecting Footing Size

Choosing the correct Concrete Footing Size for any Building is not just a matter of estimation. The size of the Footing depends on many important Engineering Factors. If these Factors are kept in mind correctly, the Foundation becomes stronger, safer, and durable for a long time.

1. Soil Bearing Capacity (SBC) – The Most Important Factor

Soil Bearing Capacity (SBC) is the capacity with which the soil can bear the building load without settling. This is the most important basis for determining Footing Size.

  • Larger Footing is required in soil with low SBC.
  • Relatively smaller Footing may be sufficient in soil with high SBC.
  • The Bearing Capacity of Clay, Sand, Gravel, and Rock is different.
  • Getting a Soil Test done before Footing Design is considered the safest and most accurate method.

Tip: If SBC is not known, then instead of estimating any Footing Size, Soil Investigation must be done.

2. Building’s Total Load

The size of the Footing also depends on how much total load the building is putting on the ground.
Main Load types:

  • Dead Load: Permanent load of walls, slabs, beams, columns, and roof.
  • Live Load: People, furniture, machines, and other usable loads.
  • Wind Load / Snow Load: Additional load in areas with strong winds or snowfall.
    The higher the total Load, the larger and stronger the Footing required.

3. Number of Stories

As the height of the Building increases, the load on the Foundation also increases.

  • 1 Storey Building: Normal sized Footing may be sufficient.
  • 2 Storey Building: Larger or thicker Footing may be required.
  • 3 Storey or more: Footing designed by Structural Engineer should be used.
    In tall buildings, not only Width but also Footing Thickness and Reinforcement are important.

4. Frost Line Depth (For Freezing Zones)

In areas where the ground freezes in winter, the Footing is made below the Frost Line.

  • Foundation can rise due to Frost Heave.
  • This problem is greatly reduced by placing the Footing below the Frost Line.
  • This Factor is especially important in cold countries and mountainous areas.

5. Climate, Groundwater, and Earthquake Zone

Local environmental conditions also affect Footing Size and Design.

  • Climate: Excessive rainfall or temperature changes can change the soil condition.
  • Groundwater Level: Extra caution is required in Foundation Design when there is high groundwater.
  • Earthquake Zone: In earthquake-prone areas, strong Footing, proper Reinforcement, and special Structural Design are adopted.
    Ignoring these conditions can affect the safety of the Foundation in the future.

6. Local Building Codes (IRC, IS Codes, Municipal Rules)

Different Building Codes and rules apply for Foundation Design in every country and region.
Examples:

  • IRC (International Residential Code) – For Residential Buildings.
  • IS Codes (Indian Standards) – For Foundation Design in India.
  • Local Municipal Rules – Rules of local municipal corporation or development authority.
    These Codes specify the Minimum Width, Depth, Reinforcement, and Safety Requirements of the Footing. Therefore, local Building Codes must always be followed before starting Construction.

Footing Size Calculation Method

To determine the correct Size of Concrete Footing, it is necessary to know the total load (Total Load) of the Building and the Safe Bearing Capacity (SBC) of the soil. Below is the most common and easy Calculation Method.

1. Basic Formula

The simplest Formula to calculate the required Area of the Footing is:
Footing Area = Total Load ÷ Safe Bearing Capacity (SBC)
Where:

  • Footing Area = Required area of the Footing (sq ft or sq m)
  • Total Load = Total load coming on the Foundation from the Building
  • Safe Bearing Capacity (SBC) = Safe load-bearing capacity of the soil

Example

Suppose:

  • Total Load = 40,000 kg
  • Soil SBC = 20,000 kg/m²
    Calculation:
    Footing Area = 40,000 ÷ 20,000 = 2 m²
    That is, approximately 2 square meters Footing Area will be required for this Column.

2. Tributary Area Method

When there are multiple Columns in a Building, the Tributary Area Method is used to calculate the Load coming on each Column.
In this Method:

  • The Floor Area around each Column is determined.
  • The Dead Load and Live Load of that Area are added to calculate the Total Load of that Column.
  • Then the Footing Size is determined based on that Load.
    This method is quite common in Residential and Commercial RCC Buildings.

3. How to Calculate Side Length of Square Footing?

If the Footing is to be made in Square Shape, first calculate its Area and then find the Side Length.
Formula:
Side Length = √(Footing Area)

Example

If Required Footing Area = 2.25 m²
Then
Side = √2.25 = 1.5 m
That is, the Size of the Footing will be:
1.5 m × 1.5 m

4. Footing Thickness Calculation Rules

The Thickness of the Footing does not depend only on Area but also on Structural Safety.
General rules:

  • Minimum Thickness is kept approximately 6 inch (150 mm).
  • The Projection (part extending out from the Column) of the Footing should be approximately equal to or greater than its Thickness.
  • Thickness is increased for Heavy Load, weak Soil, or large Columns.
  • The final Thickness is determined according to Structural Design and Reinforcement.

Note: In large Residential, Commercial, or Multi-storey Buildings, Thickness should always be designed by a Structural Engineer.

5. Example – 1 Storey House

Suppose:

  • Total Column Load = 30,000 kg
  • Soil SBC = 20,000 kg/m²

Step 1: Area

Area = 30,000 ÷ 20,000 = 1.5 m²

Step 2: Square Footing Size

Side = √1.5 ≈ 1.22 m
In practice, it can be rounded to approximately
1.25 m × 1.25 m.

Thickness

  • Minimum approximately 150–200 mm (6–8 inch)

6. Example – 2 Storey House

Suppose:

  • Total Column Load = 60,000 kg
  • Soil SBC = 20,000 kg/m²

Step 1: Area

Area = 60,000 ÷ 20,000 = 3 m²

Step 2: Square Footing Size

Side = √3 ≈ 1.73 m
In practice, it can be kept approximately
1.75 m × 1.75 m.

Thickness

  • Approximately 250–300 mm (10–12 inch) or according to Structural Design.

Important Suggestions

  • Get a Soil Test (SBC Test) done before deciding Footing Size.
  • For Multi-storey Buildings, follow Structural Design instead of Manual Calculation.
  • Prepare Footing Design only according to Local Building Codes (IS Codes, IRC, or Municipal Rules).
  • Always include Safety Factor in the Calculation.

Standard Footing Size Charts

To choose the correct size (Size) of Concrete Footing, not only the Formula but Standard Size Charts are also very useful. The Charts given below can be used as Reference for general Residential Construction. The final Design should always be decided according to Soil Test (SBC), Building Load, and Local Building Codes.

1. Soil Bearing Capacity (SBC) vs Minimum Footing Width Chart

The Chart given below shows the estimated Minimum Footing Width for general Residential Buildings.

Soil Bearing Capacity (SBC)Soil Type (General)Recommended Minimum Footing Width
1500 psfSoft Clay / Loose Soil24 inch (600 mm)
2000 psfMedium Clay / Compact Soil20 inch (500 mm)
2500 psfDense Sand18 inch (450 mm)
3000 psfDense Gravel16 inch (400 mm)
4000 psfHard Gravel / Soft Rock12–14 inch (300–350 mm)

Note: When SBC is low, the Width of the Footing has to be increased so that the Load can spread over a larger Area.

2. Recommended Footing Width by Number of Storeys

This Chart shows the estimated Footing Width for general Residential Houses.

Building TypeSuggested Footing Width
1-Storey House12–16 inch (300–400 mm)
2-Storey House16–20 inch (400–500 mm)
3-Storey House20–24 inch (500–600 mm)

Actual Width may change according to Building Load and Soil Bearing Capacity.

3. Deck / Post Footing Size Chart

The following Footing Sizes are generally used for Decks, Pergolas, and Wooden Posts.

Post SizeTypical Supported LoadRecommended Footing Diameter
4 × 4 PostLight Deck12 inch
6 × 6 PostMedium Deck16 inch
6 × 6 Heavy LoadLarge Deck / Patio Roof18 inch
Heavy Structural PostHigh Load24 inch

In Frost Area, Footing Depth should always be kept below the Frost Line.

4. Common Residential Footing Sizes

The most commonly used Standard Footing Sizes in Residential Buildings are given below.

Footing SizeGeneral Use
12 inch (300 mm)Small Load Bearing Walls, Garden Structures
16 inch (400 mm)1-Storey Residential Buildings
18 inch (450 mm)Medium Residential Load
20 inch (500 mm)2-Storey Houses
24 inch (600 mm)Heavy Load, Weak Soil, Large Buildings
30 inch (750 mm) & AboveCommercial or Special Foundations

5. Thumb Rules for Footing Size

If preliminary Planning is to be done, the Thumb Rules given below can be useful. These are only for general estimation.

Wall Footing Width

  • Generally, Footing Width = approximately 2 times the Wall Thickness.

Example:

Wall ThicknessApprox. Footing Width
9 inch Wall18 inch Footing
12 inch Wall24 inch Footing

Minimum Thickness

  • Minimum Footing Thickness approximately 6 inch (150 mm).
  • Thickness is increased in case of Heavy Load.

Projection Rule

  • The Projection of the Footing on both sides of the Column or Wall is generally kept equal to or greater than its Thickness.

Soil Rule

  • The weaker the Soil, the larger the Footing required.

Multi-Storey Buildings

  • For Buildings with more than 2 or 3 storeys, do not rely only on Thumb Rules.
  • Always use Footing designed by a Structural Engineer.

Step-by-Step Guide: How to Decide Footing Size

Deciding the correct Size of Concrete Footing is extremely important for the strength and safety of any Building. If the right process is followed, the Foundation remains safe for a long time without Settlement or Cracking. Below is the complete Step-by-Step Guide to deciding Footing Size.

Step 1: Get Soil Test Done

The first and most important step of Footing Design is to get a Soil Test done.
Soil Test tells you:

  • Soil Bearing Capacity (SBC)
  • Type of soil (Clay, Sand, Gravel, Rock)
  • Groundwater Level
  • Possibility of Settlement
    Estimating Footing Size without knowing SBC can be risky. Therefore, getting Soil Investigation done before any new construction is the best option.

Tip: The weaker the soil, the larger the Footing required.

Step 2: Calculate Building Loads

Now calculate the total load (Total Load) coming on the Foundation.
This includes:

  • Dead Load – Permanent load of walls, slabs, beams, columns, and roof.
  • Live Load – People, furniture, equipment, and other usable loads.
  • Wind Load – Additional load in areas with strong winds.
  • Snow Load – Load in areas with snowfall (where applicable).
    All Loads are added to determine the total Load coming on each Column or Wall.

Step 3: Apply the Formula

When both Total Load and Soil Bearing Capacity are known, calculate the Footing Area.

Basic Formula

Footing Area = Total Load ÷ Safe Bearing Capacity (SBC)
After this, if Square Footing is to be made, calculate its Side Length.
Side Length = √(Footing Area)
This Calculation gives the preliminary estimate of the required Width and Length of the Footing.

Step 4: Check Minimum Code Requirements

After Calculation, ensure that the Footing complies with local Building Codes.
Points to note:

  • Minimum Footing Width
  • Minimum Footing Thickness
  • Minimum Foundation Depth
  • Cover for Reinforcement
  • Safety Factors
    In India, IS Codes are generally followed, while in other countries IRC or local Municipal Building Codes may apply.

Calculation alone is not enough; following Building Codes is also necessary.

Step 5: Decide Reinforcement (Rebar)

Now select the Steel Reinforcement (Rebar) to be used in the Footing.
While deciding Reinforcement, attention is paid to the following:

  • Building Load
  • Footing Size
  • Concrete Grade
  • Soil Conditions
  • Structural Design
    Generally, Bottom Reinforcement is provided in Residential Footings so that the Footing can better withstand Bending and Cracking.

The Size and Spacing of Rebar should always be designed by a Structural Engineer.

Step 6: Plan Depth and Excavation

In the final stage, the Depth of the Foundation and Excavation plan is made.
During this, keep the following in mind:

  • Footing should reach Stable Soil.
  • In Frost Area, Footing should be below the Frost Line.
  • Keep Groundwater Level in mind.
  • Excavation should be sufficiently wide and safe.
  • Bottom Surface should be level and well Compacted.
    Correct Excavation increases both the Strength and Durability of the Foundation.

Quick Checklist

Get Soil Test done.
Calculate the Building’s Total Load.
Apply Footing Area = Load ÷ SBC Formula.
Check Minimum Requirements of Local Building Codes.
Choose proper Reinforcement (Rebar) Design.
Plan correct Depth and Excavation.

Materials, Construction and Best Practices

The strength of Concrete Footing does not depend only on its Size, but also on the correct Concrete Mix, proper Construction Method, and following Best Practices according to Building Code. In America (USA), most Residential Footings are constructed according to the Guidelines of IRC (International Residential Code) and ACI (American Concrete Institute).

1. Concrete Grade (Concrete Strength)

In the USA, Ready-Mix Concrete is generally used for Footings.

Recommended Concrete Strength

Construction TypeRecommended Concrete Strength
Standard Residential Footings3000 psi (20.7 MPa)
Heavy Residential / Garage3500 psi (24 MPa)
High Load / Commercial4000 psi (27.6 MPa) or Higher

Best Practices

  • Use fresh, properly mixed concrete.
  • Do not keep Water-Cement Ratio high.
  • Try to pour Concrete in one go (Continuous Pour).
  • Adopt necessary Precautions for Cold Weather or Hot Weather Concreting.

2. Minimum Depth and Projection Rules

The correct Depth and Projection of the Footing are very important for the Stability of the Foundation.

Minimum Footing Depth

  • Footing should always be made on Undisturbed Natural Soil.
  • In Frost areas, the Bottom of the Footing must be kept below the Local Frost Depth.
  • In Non-Frost Areas, general Residential Footings are often made at a depth of 12 inch (300 mm) or more, but it is necessary to follow the local Building Code.

Projection Rule

There should be sufficient Projection of the Footing on both sides of the Column or Wall.
General Rule:

  • Minimum 2 inch Projection on each Side (Code Minimum)
  • In practical Residential Construction, more Projection is given according to Structural Design.

Example:
If the Width of the Wall is 8 inch, then the Width of the Footing can be kept at least 12 inch or more according to the Design.

The final size of the Projection will always depend on Load and Structural Design.

3. Curing, Formwork and Compaction

Adopting correct Construction Practices keeps the Strength and Durability of the Footing for many years.

(A) Formwork

  • Formwork should be strong and Level.
  • Check all Dimensions again before Concrete Pour.
  • Concrete should not leak from the Formwork.
  • Fix Reinforcement with correct Cover.

(B) Concrete Compaction

It is necessary to remove the trapped Air from the Concrete after pouring.
Best Practices:

  • Use Internal Vibrator.
  • Avoid Honeycombing.
  • Concrete should fill the entire Footing evenly.

(C) Concrete Curing

Concrete does not gain its full Strength immediately.
Recommended Curing:

  • Do proper Curing for at least 7 days.
  • Moist Curing for 14 days is beneficial for better Strength.
  • Protect Concrete from drying quickly.
  • Keep the Surface moist in extremely hot weather.
    Correct Curing increases the Strength, Crack Resistance, and Durability of the Concrete.

4. Drainage and Waterproofing

One of the biggest problems of Foundation is Water Damage. Therefore, proper Drainage and Waterproofing are very necessary.

Drainage Best Practices

  • Slope the ground around the Foundation outward from the Building.
  • Rainwater should not accumulate near the Foundation.
  • Take the water from Downspouts away from the Foundation.
  • Use French Drain or Perimeter Drain System if necessary.

Waterproofing

If there is high Groundwater or Basement Foundation, Waterproofing is necessary.
Recommended Methods:

  • Install Waterproof Membrane.
  • Use Bituminous Coating or Elastomeric Coating.
  • Do Damp-Proofing on Foundation Wall.
  • Installing Drainage Board reduces Hydrostatic Pressure.
    These measures greatly reduce the possibility of Moisture Damage, Cracking, and Water Leakage.

USA Best Practices Checklist

Use at least 3000 psi Concrete.
Build Footing on Stable, Undisturbed Soil.
In Frost Zones, keep Footing below the Frost Line.
Ensure at least 2 inch Minimum Projection on both sides of Wall or Column (or more according to Structural Design).
Do Proper Formwork and Concrete Vibration.
Cure Concrete for at least 7 days.
Keep good Drainage arrangement around the Foundation.
Install Waterproofing and Drainage System if needed.
Carry out all work according to IRC, ACI, and Local Building Codes.

Common Mistakes and Safety Tips

Concrete Footing is the most important part of any Building Foundation. If even a small mistake happens during the Planning or Construction of the Footing, problems like Settlement, Cracks, Uneven Floors, and in serious cases Structural Failure can arise in the future. Below are the most common mistakes and the necessary Safety Tips to prevent them.

1. Skipping Soil Test

The biggest mistake is starting Footing Design without getting a Soil Test done.

Problems Caused by This

  • Correct information about Soil Bearing Capacity (SBC) is not obtained.
  • Footing Size may be chosen incorrectly.
  • Risk of Foundation Settlement increases.
  • Repair Cost can be much higher in the future.

Safety Tip

  • Get Soil Test done before starting Construction.
  • Decide Footing Size and Design only according to the Soil Report.

2. Making Undersized Footing

Many people make Footing smaller than required to save material.

Problems Caused by This

  • More Pressure falls on the Soil.
  • Foundation can settle gradually.
  • Cracks can appear in Walls and Slab.
  • Building’s Structural Stability can be affected.

Safety Tip

  • Always determine Footing Size according to Total Load and Soil Bearing Capacity.
  • Do not rely only on Thumb Rules.
  • Follow Local Building Code.

3. Poor Soil Compaction

If the soil is not Compacted properly after Excavation, the Foundation can become weak.

Problems Caused by This

  • Uneven Settlement
  • Voids under the Footing
  • Cracks in Concrete
  • Uneven settling of Foundation

Safety Tip

  • Compact the Bottom Surface properly after Excavation.
  • If Soft Soil is found, remove it and Replace with suitable Material.
  • Use Plate Compactor or other suitable equipment if necessary.

4. DIY vs Professional Advice

DIY may be possible for small Garden Shed or light Deck projects, but making Footing for House Foundation based only on internet or estimation is not safe.

When Can DIY Be Done?

  • Small Non-Structural Projects
  • Garden Structures
  • Light Fence Posts
  • Small Deck Footings (where Local Code permits)

When Is Professional Advice Required?

  • House Foundation
  • Multi-Storey Buildings
  • Weak Soil Conditions
  • Basement Foundation
  • High Load Structures
  • Seismic or Frost Zones

Safety Tip

For Residential House or larger construction work, always take advice from a Licensed Structural Engineer or Qualified Foundation Contractor.

5. Safety Regulations and Permits (USA)

In America, it is necessary to follow the rules of the Local Building Department for most Residential Foundation Projects.

Important Rules

  • Obtain Building Permit if required.
  • Follow Local Building Codes.
  • Get Required Inspections done on time.
  • Obtain information about Underground Utility Lines first.
  • Adopt Excavation Safety according to OSHA Safety Guidelines.
    The purpose of Permit and Inspection is to ensure that the Foundation is safe, Code-Compliant, and durable for a long time.

Quick Safety Checklist

Get Soil Test done before Construction.
Always decide Footing Size according to Load and SBC.
Compact Soil properly after Excavation.
Use good quality Concrete and Reinforcement.
Arrange Proper Curing and Drainage.
Complete necessary Building Permit and Inspections.
For House Foundation, take advice from Professional Engineer or Qualified Contractor.

Frequently Asked Questions (FAQs)

What is the basic formula for concrete footing size calculation?

The basic formula is Footing Area = Total Load ÷ Safe Bearing Capacity (SBC). After calculating the area, the side length for a square footing is found using Side Length = √(Footing Area).

What are the main types of concrete footings?

The main types are Strip/Wall Footing, Isolated/Pad Footing, Raft/Mat Foundation, Combined Footing, Pile Footing, and Stepped Footing.

How does Soil Bearing Capacity (SBC) affect footing size?

Lower SBC requires a larger footing to distribute the load over a bigger area, while higher SBC allows for a relatively smaller footing.

What is the minimum thickness for a concrete footing?

The minimum thickness is approximately 6 inches (150 mm). It should be increased for heavy loads or weak soil.
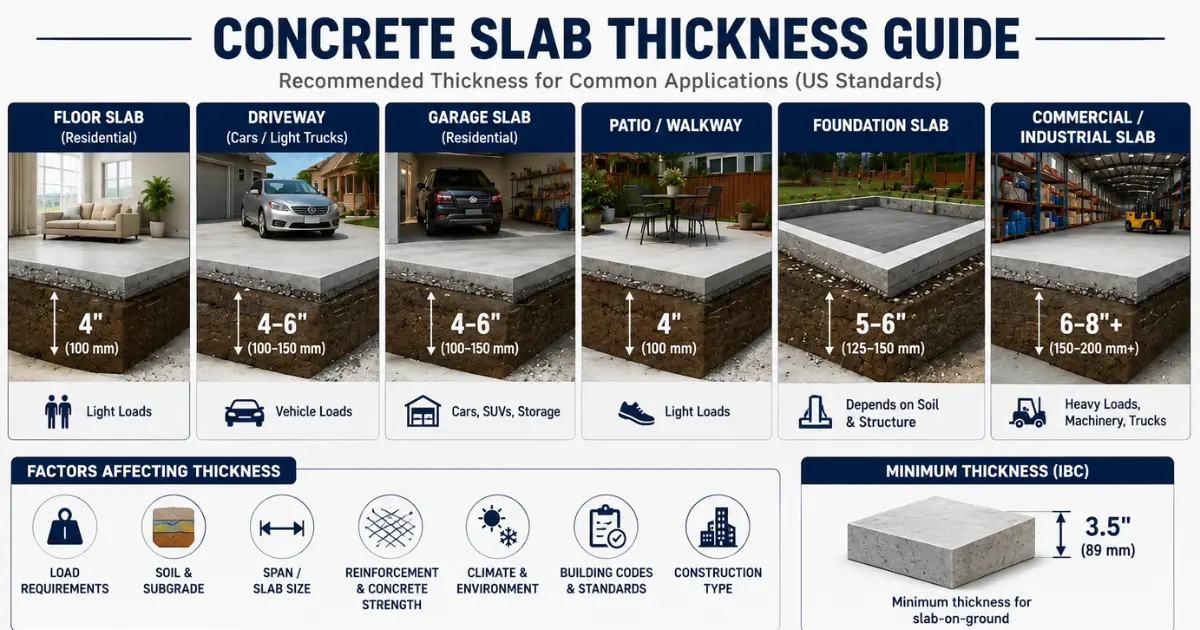
Concrete Slab Thickness Guide (2026): Minimum Thickness, Building Codes & Design Tips

Concrete Slab Thickness Guide (2026): Minimum Thickness, Building Codes & Design Tips

The strength of any construction project depends significantly on the correct Concrete Slab Thickness. Whether you are building a home floor, preparing a roof, constructing a driveway, garage, or foundation, choosing the right slab thickness is extremely important. A concrete slab with appropriate thickness not only keeps the structure strong for a long time but also helps it safely bear heavy loads. Concrete Calculator

If the slab thickness is kept less than required, several serious problems can arise over time. These include cracking, sinking, structural failure, and the need for frequent repairs. On the other hand, making the slab thicker than necessary leads to unnecessary use of extra concrete and steel, which significantly increases the project cost.

In this Concrete Slab Thickness Guide, we will discuss in detail the recommended slab thickness for various construction works, the building standards and codes to follow, the factors (such as load, soil conditions, usage, and weather) on which slab thickness depends, and the recommended thicknesses for floors, driveways, garages, patios, foundations, and commercial projects. You will also get useful tips to construct a safe, durable, and cost-effective concrete slab.

Factors Affecting Concrete Slab Thickness

The thickness of any Concrete Slab is not a fixed number; it depends on several technical and site-specific factors. If the slab thickness is determined while keeping all these factors in mind, the structure becomes more secure, durable, and usable for a long time without major repairs.

1. Load Requirements

The most important role in determining slab thickness is played by the load it will bear. The higher the load, the greater the thickness and stronger reinforcement required. Online Concrete Calculator

Dead Load (Permanent Load)

Dead Load is the permanent load that always remains on the structure, such as:

  • The slab’s own weight
  • Walls
  • Beams
  • Floor tiles and finishing
  • Permanent fixtures

If the Dead Load is high, the slab thickness may need to be increased.

Live Load (Variable Load)

Live Load changes over time. Examples include:

  • Foot traffic (people walking)
  • Household furniture
  • Cars and other vehicles
  • Industrial machinery
  • Heavy equipment

In residential buildings, Live Load is relatively low, while commercial and industrial buildings require thicker slabs due to higher loads.

2. Soil and Subgrade Conditions

If the slab is being built directly on the ground (Slab-on-Grade), the quality of the soil is extremely important.

Soil Bearing Capacity

If the soil is strong and well-compacted, a standard slab may be sufficient. However, if the soil is weak, a thicker slab, better base layer, or additional reinforcement may be needed.

Settlement Risk

Weak or uneven soil can settle over time, leading to cracks in the slab and uneven settlement issues.

Moisture Conditions

High-moisture soil can cause slab movement, swelling, and shrinkage. In such areas, proper drainage, vapor barriers, and adequate thickness are essential.

3. Span or Slab Size

This factor is particularly important for Suspended Slabs (those supported on beams or columns).

  • If the distance (clear span) between two supports is large, the risk of deflection on the slab increases.
  • For longer-span slabs, greater thickness, better reinforcement, and sometimes prestressed concrete are required.

The larger the span, the more critical the structural design of the slab becomes.

4. Concrete Strength and Reinforcement

Reinforcement

Thick slabs alone are not enough; proper reinforcement is also essential.
Main types:

  • Steel Rebar (TMT Bars)
  • Welded Wire Mesh
  • Fiber Reinforced Concrete (Steel or Synthetic Fibers)

Proper reinforcement reduces cracking in the slab and increases its load-carrying capacity.

5. Climate and Environmental Conditions

Local weather also affects concrete slab thickness.

Freeze-Thaw Cycles

In areas where temperatures repeatedly go below and above freezing, extra stress is placed on the concrete. Such areas require more durable concrete and adequate thickness.

Seismic Zones

In earthquake-prone areas, the slab design is carried out by a structural engineer according to seismic requirements. Both reinforcement and thickness are important here.

Fire Resistance

In buildings where fire rating is required, greater thickness can provide better fire resistance and protect the steel reinforcement for a longer time.

6. Building Codes and Standards

Concrete slab thickness should always be determined according to relevant building codes.

International Standards

In international projects, the following codes are commonly used:

  • IBC (International Building Code)
  • ACI (American Concrete Institute) Standards

Following these codes ensures safety, quality, and structural reliability.

7. Construction Type

Concrete slab thickness also depends on the type of construction.

Slab-on-Grade

  • Built directly on the ground.
  • Commonly used in residential floors, garages, patios, and driveways.
  • Its thickness mainly depends on soil conditions and load.

Suspended Slab

  • Supported on columns and beams.
  • Used in multi-story buildings, commercial buildings, and roof slabs.
  • Here, span, structural load, concrete grade, and reinforcement have a greater impact.

Concrete Slab Minimum Thickness Guidelines

The minimum thickness of any Concrete Slab is not determined solely by experience; it is established according to various building codes and engineering standards. The purpose of these guidelines is to ensure that the slab is sufficiently strong, safe, and durable for the long term. However, the actual thickness should always be determined according to the building’s use, load, and local construction regulations.

1. IBC/ICC Guidelines (International Building Code)

According to the International Building Code (IBC) and International Code Council (ICC), the minimum thickness for a general Slab-on-Grade (built directly on the ground) can be 3.5 inches (89 mm).

However, this is only the minimum requirement. In most residential projects, 4 inches (100 mm) thickness is more commonly used for better strength and durability, while areas with higher loads may require even greater thickness.

Note: 3.5 inches is only the minimum code requirement. The actual thickness should always be determined according to the structural design needs and local building codes.

2. ACI Recommendations (Residential & Commercial)

The American Concrete Institute (ACI) provides design guidelines for slabs in various types of structures. ACI considers not only thickness but also concrete grade, reinforcement, joint spacing, and load requirements.

Residential Applications

For home floors, patios, walkways, and standard garages, a slab of approximately 4 inches (100 mm) thickness is generally considered sufficient, provided the soil is well-prepared and only normal household loads are expected.

Commercial Applications

Shops, offices, warehouses, and other commercial buildings experience relatively higher loads. Therefore, slab thickness in these projects is often 5–6 inches (125–150 mm) or more. For heavy industrial machinery or trucks, a special design by a structural engineer is required.

3. Reinforcement Rules (When to Use Wire Mesh or Rebar?)

Concrete performs well in compression but is weak in tension. Therefore, reinforcement is essential.

Welded Wire Mesh (WWM)

Wire mesh is used in the following situations:

  • Residential floors
  • Sidewalks
  • Patios
  • Walkways
  • Light-load slabs

It helps control small shrinkage cracks.

Steel Rebar (TMT Bars)

Rebar is used when:

  • Vehicles will drive on the driveway
  • Cars or SUVs will be parked in the garage
  • A foundation slab is being built
  • Commercial or industrial loads are high
  • A suspended slab is being constructed

In heavy-load structures, wire mesh alone is not sufficient; properly sized and spaced steel rebar is required.

Fiber Reinforcement

In some projects, steel fibers or synthetic fibers are also used. These help reduce shrinkage cracks, but they are generally not considered a complete replacement for rebar in most structural applications.

4. Importance of Vapor Barrier

If the slab is being built directly on the ground, installing a Vapor Barrier (Plastic Moisture Barrier) underneath it is extremely important.

Key benefits:

  • Prevents soil moisture from reaching the concrete.
  • Protects flooring materials (tiles, wood, vinyl, etc.) from moisture damage.
  • Reduces the possibility of mold and dampness.
  • Increases the long-term durability of the concrete.

Vapor barriers are especially recommended for residential floors, basements, and indoor slabs.

5. Importance of Base Preparation

Even a slab with the right thickness will only remain durable in the long run if the base underneath it is properly prepared.

Good base preparation includes:

  • Removing weak soil
  • Laying a granular base (gravel/crushed stone)
  • Proper compaction
  • Leveling the surface
  • Arranging drainage

If the base is not prepared correctly, problems such as slab settlement, cracking, and uneven surfaces can occur in the future, no matter how thick the slab is.

How to Determine/Design Concrete Slab Thickness

Determining the correct Concrete Slab Thickness is not just a matter of general estimation. It depends on load, soil conditions, slab size (span), concrete grade, reinforcement, and the purpose of construction. For small residential projects, rules of thumb can be useful, but for large or heavy-load projects, structural engineering design is always necessary.

1. Rule of Thumb vs Structural Engineering Calculation

Rule of Thumb (General Guidelines)

In small residential projects, many people determine slab thickness based on experience. Examples:

  • Walkway/Patio – approximately 4 inches (100 mm)
  • Residential Floor – approximately 4 inches (100 mm)
  • Garage – 4–6 inches (100–150 mm)
  • Driveway – 5–6 inches (125–150 mm)

These are only general guidelines. If the soil is weak, heavy vehicles will be used, or there are special structural requirements, relying solely on rules of thumb is not safe.

Structural Engineering Calculation

In engineering design, slab thickness is determined based on scientific calculations. This involves analyzing many factors, such as:

  • Dead Load and Live Load
  • Soil Bearing Capacity
  • Concrete Grade
  • Reinforcement Details
  • Span Length
  • Deflection Limits
  • Crack Control
  • Safety Factors
  • Building Codes

This type of calculation ensures that the slab can safely bear the expected loads for a long time.

2. Design Methods, Software, and Engineering Tools

In large construction projects, simple formulas are not enough. Structural engineers use various design methods and software for more accurate analysis.

Westergaard Method (for Slabs-on-Grade)

The Westergaard Method is a well-known engineering method especially for designing Slabs-on-Grade (built directly on the ground).

This method analyzes factors such as:

  • Wheel Load
  • Concrete Strength
  • Modulus of Subgrade Reaction (Soil Support)
  • Slab Thickness
  • Edge and Corner Stress
  • Load Position

It helps determine how thick the slab needs to be for a specific load to avoid cracking or structural failure.

Structural Design Software

Professional engineers use modern software for precise analysis. These tools perform calculations including:

  • Load Analysis
  • Finite Element Analysis (FEA)
  • Bending Moments
  • Deflection
  • Crack Width
  • Reinforcement Design

With the help of these tools, different load conditions can be simulated to create safe and economical designs.

3. Not Just Thickness — The Entire Structural System Matters

Many people assume that simply making a thick concrete slab will make the structure strong. In reality, this is not the case.

For a safe and durable concrete slab, all the following elements are equally important:

  • Correct slab thickness
  • Appropriate concrete grade
  • Proper reinforcement (rebar/wire mesh)
  • Good-quality concrete
  • Proper base preparation
  • Soil compaction
  • Vapor barrier
  • Control and expansion joints
  • Proper concrete curing
  • Drainage system

If there is any deficiency in even one of these parts, problems such as cracking, settlement, and structural issues can arise despite a thick slab.

4. Why Get the Design from a Professional Structural Engineer?

If your project involves any of the following, it is safest to consult a structural engineer:

  • Multi-story building
  • Commercial building
  • Warehouse
  • Industrial floor
  • Heavy machinery installation
  • Truck loading area
  • Large foundation
  • Suspended slab
  • Long-span structure

A structural engineer not only determines slab thickness but also analyzes the entire structural system, including:

  • Load calculations
  • Concrete grade selection
  • Reinforcement layout
  • Beam and column coordination
  • Foundation design
  • Safety requirements
  • Building code compliance

This makes the construction safer, more durable, and capable of avoiding expensive future repair costs.

Concrete Slab Thickness Maintenance & Longevity

A well-designed and properly constructed Concrete Slab can be used for decades without major problems. However, its actual service life depends not only on the quality of the concrete but also on correct slab thickness, proper reinforcement, base preparation, drainage, curing, and regular maintenance.

Proper Thickness Means Longer Service Life

Choosing the right thickness for a concrete slab is one of the most important parts of its long-term performance.

When a slab is designed according to the expected load, it offers many advantages:

  • Safely bears heavy loads
  • Reduced risk of cracking and deflection
  • Lower chance of settlement
  • Better resistance to freeze-thaw damage (in cold areas)
  • Lower maintenance and repair costs
  • Increased overall service life of the slab

Conversely, if the slab is undersized (thinner than required), hairline cracks, surface damage, uneven settlement, and structural problems can develop over time, potentially requiring expensive repairs or replacement.

Crack Repair Tips

Small hairline cracks can appear in concrete over time. Not all cracks indicate structural problems, but they should not be ignored.

Hairline Cracks

If the crack is very thin and not spreading:

  • Clean the crack thoroughly
  • Use a suitable concrete crack filler or flexible sealant
  • Seal the surface to prevent moisture from entering

Wider Cracks

If the crack is widening, continuously growing, or the slab appears uneven:

  • Epoxy injection or professional concrete repair methods may be needed
  • Check for foundation movement or soil settlement
  • Have it inspected by a structural engineer or concrete repair specialist if necessary

Important: If the crack width is increasing, there is vertical displacement, or the slab is settling, surface repair alone is not enough. The root cause must be addressed first.

Concrete Sealing Tips

Applying a concrete sealer improves both the durability and appearance of the slab.

Key benefits of concrete sealing:

  • Reduced water penetration
  • Protection from freeze-thaw damage
  • Less effect from oil, grease, and chemical stains
  • Reduced surface wear
  • Easier cleaning
  • Increased service life of the concrete

Best Practices

  • Apply sealer only after the concrete has fully cured
  • Re-seal exterior slabs (driveways, garages, patios) periodically, especially in high-traffic or harsh weather areas
  • Follow the manufacturer’s recommended maintenance schedule

Additional Maintenance Tips

To keep a concrete slab in good condition for a long time:

  • Prevent water from pooling on the surface
  • Keep expansion and control joints clean
  • Avoid heavy impact or overloading
  • Limit the use of de-icing chemicals (especially on new concrete)
  • Regularly inspect for cracks, settlement, and surface wear
  • Repair minor damage promptly to prevent it from becoming a major problem

What is the standard concrete slab thickness for residential homes?

For most residential projects, a 4-inch (100 mm) concrete slab is the standard thickness for floors, patios, and walkways. However, the required thickness may vary depending on soil conditions, expected loads, and local building codes.

What is the minimum concrete slab thickness allowed by code?

According to the International Building Code (IBC), a slab-on-ground can have a minimum thickness of 3.5 inches (89 mm) in certain applications. In practice, most residential slabs are built at 4 inches for better durability and performance.

How thick should a concrete driveway be?

A typical residential driveway should be 4–6 inches thick. If the driveway will regularly support heavy trucks, RVs, or commercial vehicles, a thicker slab with proper reinforcement is recommended.

Does soil type affect concrete slab thickness?

Yes. Weak, expansive, or poorly compacted soil may require a thicker slab, improved base material, or additional reinforcement. A well-prepared and compacted subgrade helps prevent cracking and settlement.

How long does a properly built concrete slab last?

A properly designed and maintained concrete slab can last 30–50 years or longer. Its lifespan depends on slab thickness, concrete quality, reinforcement, drainage, weather conditions, and regular maintenance.

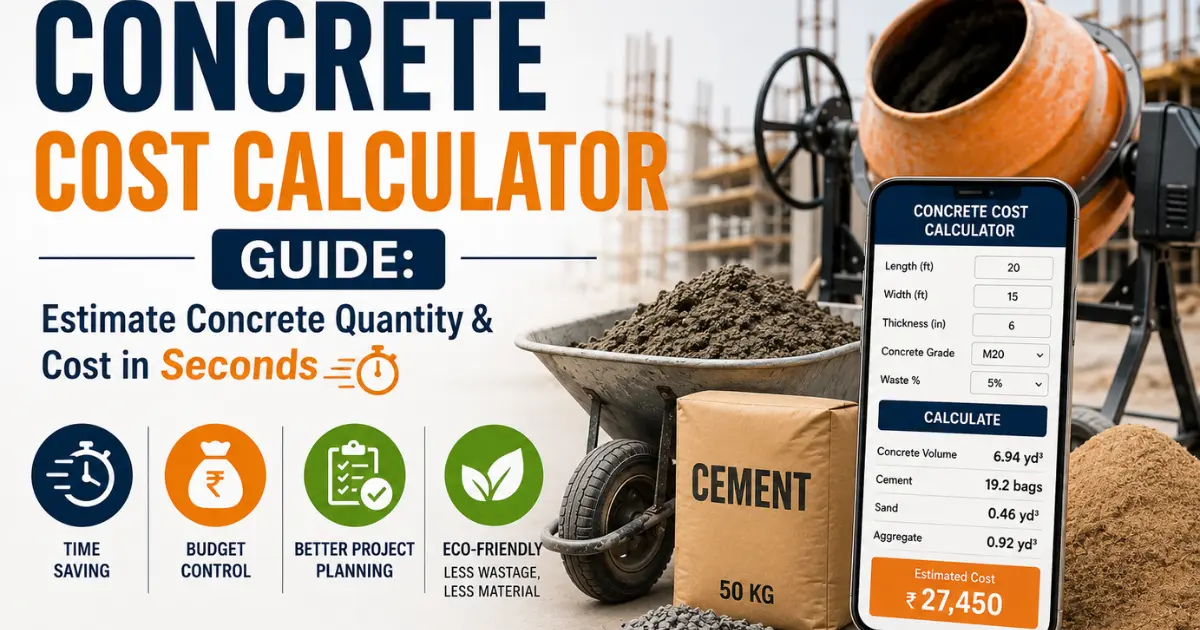
Concrete Cost Calculator Guide: Estimate Concrete Quantity & Cost in Seconds

Concrete Cost Calculator Guide: Estimate Concrete Quantity & Cost in Seconds

Knowing how much concrete will cost in total is extremely important before starting any construction project. Whether you are working on a driveway, slab, foundation, patio, or any other concrete project, accurate cost estimation plays a vital role in keeping your budget under control. A Concrete Cost Calculator is used to make this task easy.

The Concrete Cost Calculator is an online tool that calculates the estimated concrete quantity (volume) and total cost based on your project’s length, width, thickness, concrete price, and other necessary information. It tells you in advance how much concrete your project needs and approximately how much it will cost.

This calculator holds great importance in the construction industry because it helps with accurate budget planning, reducing unnecessary material wastage, and providing correct cost estimation. With the right estimate, you can avoid buying extra material and also prevent the problem of running short of material in the middle of the project.

If you calculate the cost manually, there is a higher chance of long calculations, unit conversions, and human errors. On the other hand, the Concrete Cost Calculator provides fast, easy, and more accurate results in just a few seconds, saving both time and effort.

In this Concrete Cost Calculator Guide, you will learn what a Concrete Cost Calculator is, how it works, the easy formula for calculating concrete cost, which factors affect concrete prices, how to use the calculator correctly, practical examples of cost calculation, and useful tips that will help reduce the cost of your construction project.

Below is the “Factors Affecting Concrete Cost” section for your “Concrete Cost Calculator Guide” article. All the points you mentioned have been included in SEO-friendly and easy language.

Factors Affecting Concrete Cost

The total cost of concrete does not depend only on the price of cement. The final cost of any construction project is affected by many different factors. If you understand all these factors, you can prepare your project budget more accurately and save yourself from unnecessary expenses.

1. Material Costs

Concrete is mainly made up of five major materials. Any increase or decrease in their prices changes the total concrete cost.

Main Materials:

  • Cement – The main component that provides strength to concrete.
  • Sand – Helps bind cement and aggregate together.
  • Aggregate (Gravel/Stone) – Provides strength and durability to concrete.
  • Water – Required for cement hydration.
  • Admixtures (Chemical Additives) – Added to improve setting time, workability, water resistance, or strength.

Note: If the price of cement or aggregate increases, the total concrete cost also increases.

2. Concrete Mix Ratio

The mix ratio of concrete also affects its price. Different grades and mix designs are used for different construction projects.

Some Common Mix Ratios:

Concrete GradeCommon Mix RatioTypical Use
M151 : 2 : 4Small residential work
M201 : 1.5 : 3Slabs, footings, driveways
M25Design MixResidential & commercial structures
M30Design MixHeavy-duty structures

Higher-grade concrete uses more cement and better-quality materials, so its cost is also higher.

3. Concrete Volume Calculation

The larger the concrete volume, the higher the total cost will be.

Most Common Formula:

Volume = Length × Width × Thickness (Depth)

If measurements are in feet, first calculate cubic feet and then convert to cubic yards or cubic meters as needed.

Accurate volume calculation ensures you neither run short of concrete nor buy extra material.

4. Labor Charges

Labor is required for pouring, mixing, leveling, vibrating, finishing, and curing the concrete.

Labor cost depends on:

  • Project size
  • Skilled or unskilled workers
  • Project completion time
  • Local wage rates

In some areas, labor cost can be equal to or even higher than material cost.

5. Transportation and Delivery Charges

If you order Ready-Mix Concrete, delivery charges are also included in the total cost.

Transportation cost depends on:

  • Distance from supplier to project site
  • Quantity of concrete
  • Type of delivery truck
  • Fuel prices
  • Number of trips required

Delivery charges are generally higher in remote areas.

6. Formwork, Curing, and Finishing Costs

Concrete cost is not limited to materials only. The expense of these additional tasks is also included:

Formwork

Wooden, steel, or plastic forms are used to give concrete the correct shape.

Curing

Proper curing for 7–28 days is necessary to increase concrete strength.

Finishing

Different types of finishes can be done according to the project, such as:

  • Smooth Finish
  • Broom Finish
  • Stamped Concrete
  • Exposed Aggregate Finish
  • Polished Finish

Special finishes can increase the total cost.

7. Location-Based Price Variation

Concrete prices are not the same in every city, state, or region.

Concrete cost can vary according to:

  • Metropolitan cities
  • Small cities
  • Rural areas
  • Urban areas

Main reasons for price difference:

  • Material availability
  • Transportation distance
  • Local taxes
  • Labor rates
  • Market competition

For example, concrete prices in big cities are usually higher than in rural areas.

8. Current Market Rates

Concrete prices keep changing with time.

Market rates are affected by:

  • Changes in cement and steel prices
  • Fuel cost
  • Inflation
  • Seasonal demand
  • Government policies
  • Supply chain issues

For example, during construction season, concrete prices are often higher than on normal days.

Quick Summary

FactorImpact on Concrete Cost
Material CostsCement, sand, aggregate, water, admixtures
Mix Ratio / GradeHigher grades generally cost more
Concrete VolumeLarger volume increases total cost
Labour ChargesDepends on workforce and project size
TransportationDelivery distance and fuel costs affect pricing
Formwork & FinishingAdditional services increase overall cost
LocationPrices vary by city, state, and rural/urban areas
Market RatesInflation, season, and material prices influence cost

How Does a Concrete Cost Calculator Work?

The Concrete Cost Calculator is a tool that estimates the total concrete cost based on the project dimensions, concrete mix, material prices, and other expenses entered by you. It gives faster, easier, and more accurate results compared to manual calculation.

The calculator mainly works in four steps — it first calculates the concrete volume, then calculates the dry volume, determines the required material quantities, and finally adds all expenses to show the total cost.

Step 1: Calculate Concrete Volume

First, the calculator calculates the wet volume (concrete volume) of your project.

Basic Formula:

Volume = Length × Width × Height (Thickness)

If all measurements are in meters, the result will be in cubic meters (m³).
If measurements are in feet, the result will be in cubic feet (ft³).

Example:
Length = 5 m
Width = 4 m
Thickness = 0.15 m

Volume = 5 × 4 × 0.15 = 3 Cubic Meters

This is the actual (wet) quantity of concrete needed for your project.

Step 2: Apply Dry Volume Factor

When preparing concrete, some material is used in mixing, voids, and compaction. Therefore, material calculation is always done on the basis of dry volume.

Commonly used dry volume factors:

  • 1.54 (most commonly used)
  • 1.52 (used in some engineering calculations)

Formula:

Dry Volume = Wet Volume × 1.54

Example:
If Wet Volume = 3 m³
Dry Volume = 3 × 1.54 = 4.62 m³

This dry volume is then used to calculate material quantities.

Note: Depending on different standards or project requirements, either the 1.52 or 1.54 factor can be used.

Step 3: Calculate Material Quantity

After getting the dry volume, the calculator determines the quantities of cement, sand, and aggregate according to the selected concrete mix ratio (e.g., 1:2:4).

For example, if the mix ratio is 1 : 2 : 4, total parts = 1 + 2 + 4 = 7 Parts.

Material Calculation Formulas:

Cement

Cement = (1 ÷ Total Parts) × Dry Volume

Sand

Sand = (2 ÷ Total Parts) × Dry Volume

Aggregate

Aggregate = (4 ÷ Total Parts) × Dry Volume

After this, the calculator shows cement in bags and sand & aggregate in cubic meters or cubic feet.

If water or admixtures are included in the project, their estimated quantities can also be added.

Step 4: Calculate Total Concrete Cost

Once the quantities of all materials are known, the calculator calculates the total cost by considering the current market price of each material.

In addition, other necessary expenses are also added, such as:

  • Material Cost
  • Labor Charges
  • Transportation & Delivery Charges
  • Formwork Cost
  • Finishing Cost
  • Curing Cost
  • Equipment Rental (if applicable)
  • Other Project Expenses

Total Cost Formula:

Total Cost = Material Cost + Labor Cost + Other Expenses

This formula is the basis of almost all Concrete Cost Calculators.

What You Get in Calculator Output

After using the Concrete Cost Calculator, you generally get the following information:

  • ✅ Concrete Volume (Cubic Meter / Cubic Feet)
  • ✅ Dry Volume
  • ✅ Cement Bags Required
  • ✅ Sand Quantity
  • ✅ Aggregate Quantity
  • ✅ Estimated Material Cost
  • ✅ Labor Cost
  • ✅ Transportation Cost
  • ✅ Other Construction Expenses
  • Final Estimated Concrete Cost

For the most accurate results, always enter length, width, thickness, mix ratio, material prices, and labor charges correctly. If possible, also add a 5–10% contingency budget so that price changes, material waste, or unexpected expenses do not affect your project budget.

Step-by-Step Guide to Use Concrete Cost Calculator

Using the Concrete Cost Calculator is very easy. You just need to enter some required information (inputs) about your project, and the calculator tells you the concrete quantity (volume), material quantities, and total estimated cost in a few seconds.

Follow the steps below to easily estimate the cost of any concrete project.

Step 1: Enter Project Dimensions

First, enter the correct measurements of your project.
You usually need to fill in the following dimensions:

  • Length
  • Width
  • Thickness / Depth

Step 2: Select Concrete Grade

Now choose the concrete grade according to your project.

Some common grades:

  • M15 – Small residential projects
  • M20 – Slabs, footpaths, driveways
  • M25 – Residential buildings
  • M30 – Commercial & heavy-duty structures

The quantity of cement and other materials changes according to the concrete grade, which also affects the total cost.

Step 3: Select Mix Type

Next, choose the mix type of concrete.

Nominal Mix

  • For small residential projects
  • Uses pre-defined mix ratios (e.g., 1:2:4, 1:1.5:3)

Design Mix

  • For commercial and large projects
  • Designed according to structural requirements
  • More accurate and higher-strength concrete

Step 4: Select Location

Concrete prices can vary in every city and state.

Therefore, enter your:

  • City
  • State
  • or Project Location

in the calculator so you get a more accurate cost estimate based on local material rates and labor charges.

Step 5: Enter Wastage Percentage

Some concrete waste is normal in construction work.

That is why most calculators ask for wastage percentage.

Recommended values:

  • 5% – For well-planned projects
  • 10% – For complex projects or when there is higher chance of waste

This extra quantity prevents your project from stopping in the middle.

How to Use Online Concrete Cost Calculator (Example)

Suppose you need to make a 15 ft × 12 ft concrete slab with 4 inches thickness.

Enter the following information in the calculator:

  • Length = 15 ft
  • Width = 12 ft
  • Thickness = 4 in
  • Concrete Grade = M20
  • Mix Type = Nominal Mix
  • Location = Your City/State
  • Wastage = 5%

Now click the Calculate button.

In just a few seconds, the calculator will show you:

  • Concrete Volume
  • Dry Volume
  • Cement Quantity
  • Sand Quantity
  • Aggregate Quantity
  • Estimated Material Cost
  • Labor Cost
  • Total Estimated Concrete Cost

This way, you get the estimated cost of the entire project immediately without doing manual calculations.

Mobile App vs Website Calculator

Today, most Concrete Cost Calculators are available in both mobile apps and websites. Both have their own advantages.

FeatureMobile AppWebsite Calculator
InstallationNeeds app installationNo installation required
AccessibilityUse anytime, anywhereInstant access via browser
UpdatesMay need app updatesAlways latest version available
Ease of UseMobile-friendly interfaceMore convenient on large screens
Best ForOn-site engineers, contractorsHomeowners, builders, DIY users

Which Option is Better?

  • If you work on a construction site and need to calculate costs repeatedly, a mobile app is more convenient.
  • If you are doing project planning from home, office, or laptop, a website-based Concrete Cost Calculator is a better option because entering data and viewing results is easier on a large screen.

Material Quantity Calculation Table

To make an accurate concrete cost estimate, it is necessary to know how much cement, sand, and aggregate are required to make 1 cubic meter of concrete. This quantity changes according to the concrete grade (or mix ratio).

The chart below shows the estimated material requirement for common nominal mixes and popular concrete grades.

Note: For design mix (such as M25, M30 and above), the actual material quantity may vary according to project design, structural requirements, and mix design report. The values below are approximate.

Material Quantity per Cubic Meter of Concrete

Concrete GradeMix RatioCement (50 kg Bags)Sand (m³)Aggregate (m³)
M101 : 3 : 64.4 Bags0.480.96
M151 : 2 : 46.3 Bags0.440.88
M201 : 1.5 : 38.0 Bags0.420.84
M25*Design Mix8.5–9.0 Bags0.400.82
M30*Design Mix9.5–10 Bags0.380.80

*M25 and M30 are generally Design Mix Concrete, so actual material requirement may differ according to the mix design.

  • Always choose the correct concrete grade for your project.
  • Update material prices according to local market rates.
  • Always add 5–10% wastage in the final estimate.
  • If you are using M25 or M30 Design Mix, take material quantities according to the site engineer or mix design report.

Benefits of Using Concrete Cost Calculator

In today’s time, a Concrete Cost Calculator is not just a convenience but has become an important tool for better planning of any construction project. Whether you are a homeowner, contractor, builder, civil engineer, or DIY enthusiast, this tool helps you get a fast and accurate estimate of concrete quantity and cost.

Below are the major benefits of using a Concrete Cost Calculator.

1. Time Saving

If you calculate concrete cost manually, you have to separately calculate volume, material quantity, mix ratio, and total cost. This can take a lot of time.

The Concrete Cost Calculator performs all these calculations automatically in just a few seconds.

Benefits:

  • No need for manual calculation.
  • Get cost estimate in a few seconds.
  • Fast calculation even for large and complex projects.
  • Saves time from doing repeated calculations.

2. Prevents Budget Overrun

The biggest problem in construction projects is budget overrun, which often occurs due to incorrect material estimation.

The Concrete Cost Calculator helps you prepare your budget in advance by telling you the right quantity of material and its estimated cost.

Benefits:

  • Protection from buying unnecessary material.
  • Reduced chance of material falling short during the project.
  • Better control over the total project cost.
  • Helps in reducing unexpected expenses.

3. Better Project Planning

Every successful construction project starts with good planning.

The Concrete Cost Calculator gives you this information in advance:

  • How much concrete will be required.
  • How many cement bags are needed.
  • How much sand and aggregate will be required.
  • What will be the estimated expense for buying materials.
  • How much budget should be kept for labor and other expenses.

This allows you to prepare the project schedule, material procurement, and budget planning in advance, making the entire work more organized.

4. Eco-Friendly (Less Waste, Less Material)

Due to wrong estimation, often more concrete is prepared or purchased than needed, which causes material waste.

The Concrete Cost Calculator provides accurate quantity estimates, so only the required amount of material is purchased.

Environmental Benefits:

  • Reduced concrete waste.
  • Decreased unnecessary consumption of cement, sand, and aggregate.
  • Less material disposal at the construction site.
  • Better utilization of natural resources.
  • Promotes sustainable and eco-friendly construction.

Quick Summary

BenefitHow It Helps
Time SavingCalculates concrete cost and material quantity in just a few seconds.
Prevents Budget OverrunSaves from extra expenses by providing accurate cost estimates.
Better Project PlanningHelps in advance planning of materials, labor, and budget.
Eco-FriendlyReduces both cost and environmental impact due to less material waste.

If you are working on any concrete slab, foundation, driveway, patio, footing, or other construction project, using a Concrete Cost Calculator is a smart decision. It not only saves your time but also ensures accurate budget planning, better project management, and reduced material waste. As a result, your construction work becomes more cost-effective, organized, and environmentally friendly.

Can I use this calculator on mobile?

Yes, most Concrete Cost Calculators are mobile-friendly. You can also download a mobile app for on-site calculations.

How much does one cubic meter of concrete cost?

The cost of one cubic meter of concrete varies by location, grade, and current market rates. It usually ranges between $80 to $150+ depending on the city and concrete grade (M20, M25, etc.).

Does the calculator include labor and transportation cost?

Yes, most good Concrete Cost Calculators include labor charges, transportation/delivery charges, formwork, and finishing costs along with material costs.

How accurate is the Concrete Cost Calculator?

The calculator is quite accurate when you enter correct measurements and current local material prices. For best results, add 5–10% extra for wastage and unexpected expenses.

How Many Bags of Concrete Do I Need

How Many Bags of Concrete Do I Need? Calculator & Chart for 80lb, 60lb Bags

Have you ever thought about how many bags of concrete you need when buying for a small concrete project, like a fence post, small slab, patio, steps, or repair work? If your calculation is wrong, you will either have to buy more bags in the middle of the job, which wastes time and effort, or you will end up buying extra bags and wasting your money. Concrete calculator

That is why it is very important to estimate the right number of concrete bags before any small or medium construction work. But another question also comes up—should you buy bags of concrete or order ready-mix concrete? The answer depends on the size of your project. For small jobs, concrete bags are usually more economical and convenient, while for large projects, ready-mix concrete can save both time and labor.

Online Concrete calculator

In this article, you will learn how many bags of concrete you need. We will provide you with an easy formula, a useful concrete bag calculator, different examples, and practical tips that will help you buy the exact amount of concrete without guesswork and avoid problems like extra cost or shortage of material.

Understanding Concrete Bags

Before estimating the right amount for any concrete project, it is important to understand that concrete bags are available in different weights and the yield (amount of concrete) you get from each bag is different. Once you have this information, you can easily decide how many bags you need to buy for your project.

Common Concrete Bag Sizes

The most commonly used concrete bags in the market are the following:

  • 40 lb (18.1 kg) – For small repair work, post holes, and DIY projects.
  • 60 lb (27.2 kg) – The most popular choice for medium-sized home projects.
  • 80 lb (36.3 kg) – Most commonly used for slabs, footings, and larger concrete work.

Note: Different brands may have slightly different yields per bag, but the following general values are commonly used.

Bag SizeApprox. Yield
40 lb Bag0.30 Cubic Feet
60 lb Bag0.45 Cubic Feet
80 lb Bag0.60 Cubic Feet

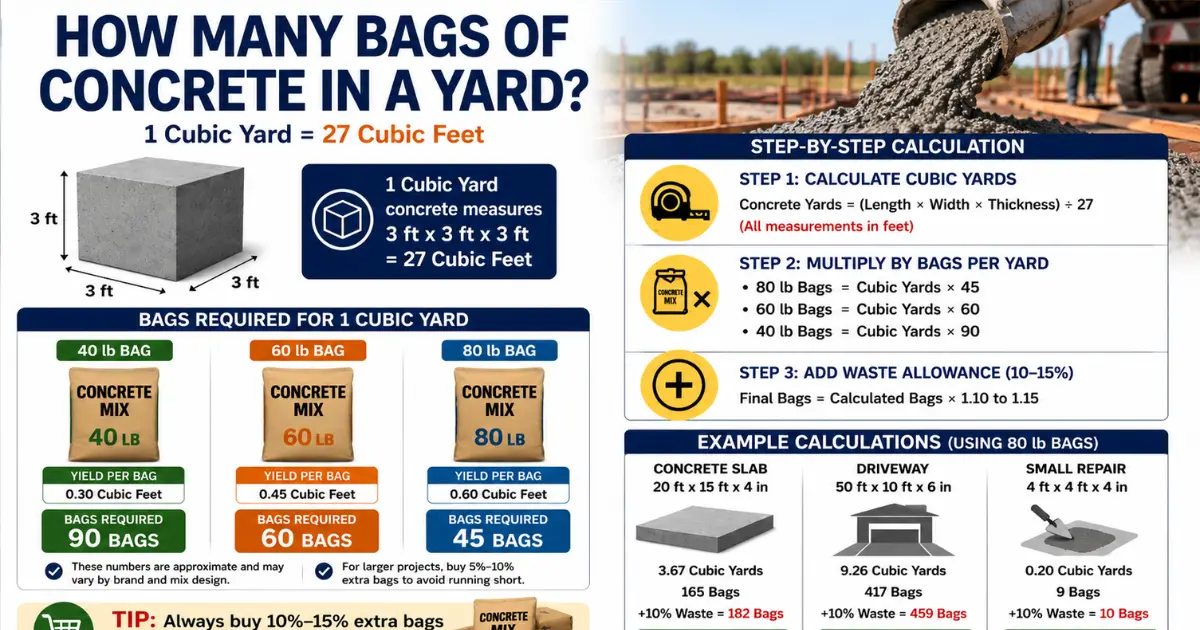
1 Cubic Yard = 27 Cubic Feet

Concrete quantity is usually measured in Cubic Yards (yd³) or Cubic Feet (ft³).

Easiest rule to remember:
1 Cubic Yard = 27 Cubic Feet

This conversion is used in most concrete calculators and construction work. If your project volume is in cubic feet, divide it by 27 to convert to cubic yards.

How Many Concrete Bags for 1 Cubic Yard? (Quick Chart)

The chart below instantly tells you approximately how many bags are needed to make 1 Cubic Yard of Concrete.

Bag SizeBags Required for 1 Cubic Yard
40 lb BagApprox. 90 Bags
60 lb BagApprox. 60 Bags
80 lb BagApprox. 45 Bags

How Many Bags of Concrete Do I Need Basic Formula to Calculate Bags

Calculating the number of concrete bags needed for any concrete project is not difficult. You only need to know the Length, Width, and Thickness of your project. Then follow the three easy steps below. Concrete Culator

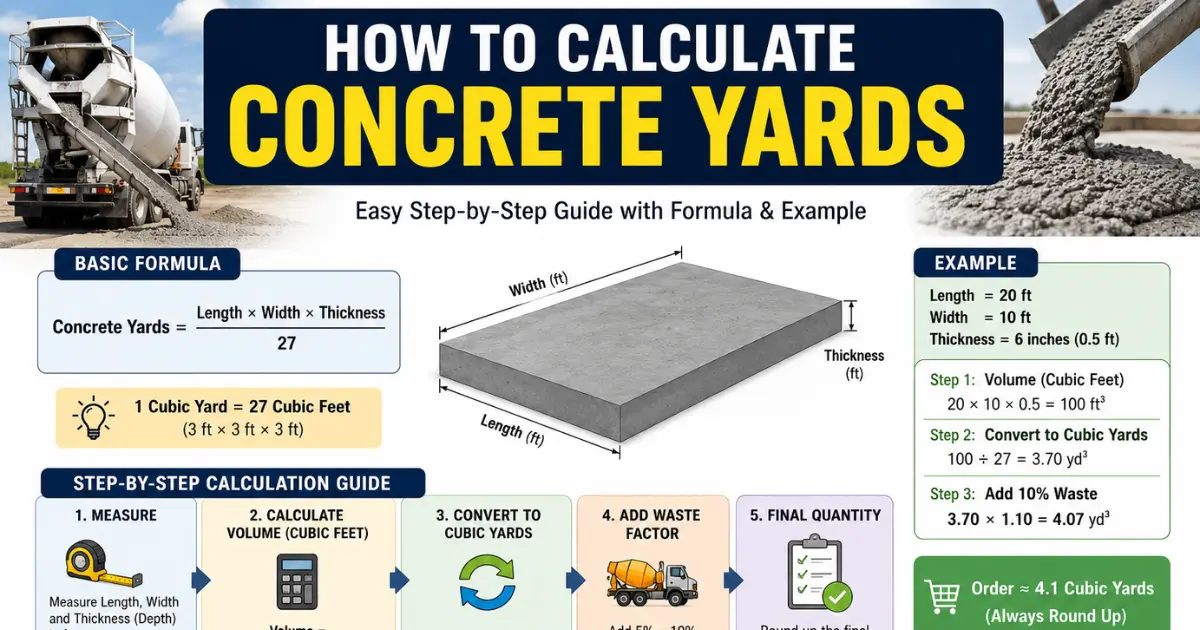
Step 1: Calculate the Volume (Cubic Yards) of the Area

First, calculate the total Volume of your project.

Because 1 Cubic Yard = 27 Cubic Feet, divide the cubic feet by 27 to get cubic yards.

Step 2: Calculate the Number of Bags

Now multiply the obtained Cubic Yards by Bags per Yard according to your chosen bag size.

Example:

  • If your Project = 2 Cubic Yards
  • And you are using 80 lb Bags
  • 1 Cubic Yard ≈ 45 Bags

Then,
2 × 45 = 90 Bags

Step 3: Add 10–15% Extra (Waste Allowance)

There can always be some waste, spillage, uneven surface, or measurement error in construction work. Therefore, it is better to add 10% to 15% extra concrete bags in the final calculation.

Final Bags = Calculated Bags × 1.10 to 1.15

If your calculation shows 90 Bags are needed, then the safe quantity will be:

  • 10% Extra = 99 Bags
  • 15% Extra = 104 Bags

This almost eliminates the chance of your work stopping in the middle.

Quick Reference Chart

If you don’t have time to use the formula every time, the Quick Reference Charts below will help you. With their help, you can find out in just a few seconds how many bags are needed for 1 Cubic Yard of Concrete and how much area one concrete bag covers at different thicknesses.

Bags per Cubic Yard

The chart below shows the approximate number of bags for the most commonly used concrete bag sizes.

Bag SizeApprox. Yield per BagBags Needed for 1 Cubic Yard
80 lb0.60 cu ft45 Bags
60 lb0.45 cu ft60 Bags
40 lb0.30 cu ft90 Bags

Note: This is a general estimate. Yield per bag may vary slightly by brand.

Coverage Table (How Much Area Does One Bag Cover?)

The charts below show approximately how much area (Square Feet) one Concrete Bag covers at different thicknesses (4″, 5″, 6″).

80 lb Concrete Bag

ThicknessApprox. Coverage
4 inches1.8 sq ft
5 inches1.4 sq ft
6 inches1.2 sq ft

60 lb Concrete Bag

ThicknessApprox. Coverage
4 inches1.35 sq ft
5 inches1.08 sq ft
6 inches0.90 sq ft

40 lb Concrete Bag

ThicknessApprox. Coverage
4 inches0.90 sq ft
5 inches0.72 sq ft
6 inches0.60 sq ft

How Many Bags of Concrete Do I Need Step-by-Step Calculation Guide

If you want to know how many bags of concrete you need, follow the easy steps below. Accurate measurement and calculation will ensure you neither buy too little concrete nor waste money on extra bags.

Step 1: Take Project Measurements

First, take accurate measurements of the area where you need to pour concrete.

You will only need three measurements:

  • Length – in Feet
  • Width – in Feet
  • Thickness – in Inches

Example:

  • Length = 12 Feet
  • Width = 10 Feet
  • Thickness = 4 Inches

Tip: Always use a tape measure and double-check all measurements to avoid mistakes in calculation.

Step 2: Convert Thickness from Inches to Feet

The concrete volume formula works in Feet, so if thickness is in inches, first convert it to feet.

Conversion Formula

Thickness (Feet) = Thickness (Inches) ÷ 12

Quick Conversion Table

Thickness (Inches)Thickness (Feet)
2″0.167 ft
3″0.25 ft
4″0.333 ft
5″0.417 ft
6″0.50 ft
8″0.667 ft

Step 3: Calculate Concrete Volume

Now calculate the project volume.

Formula

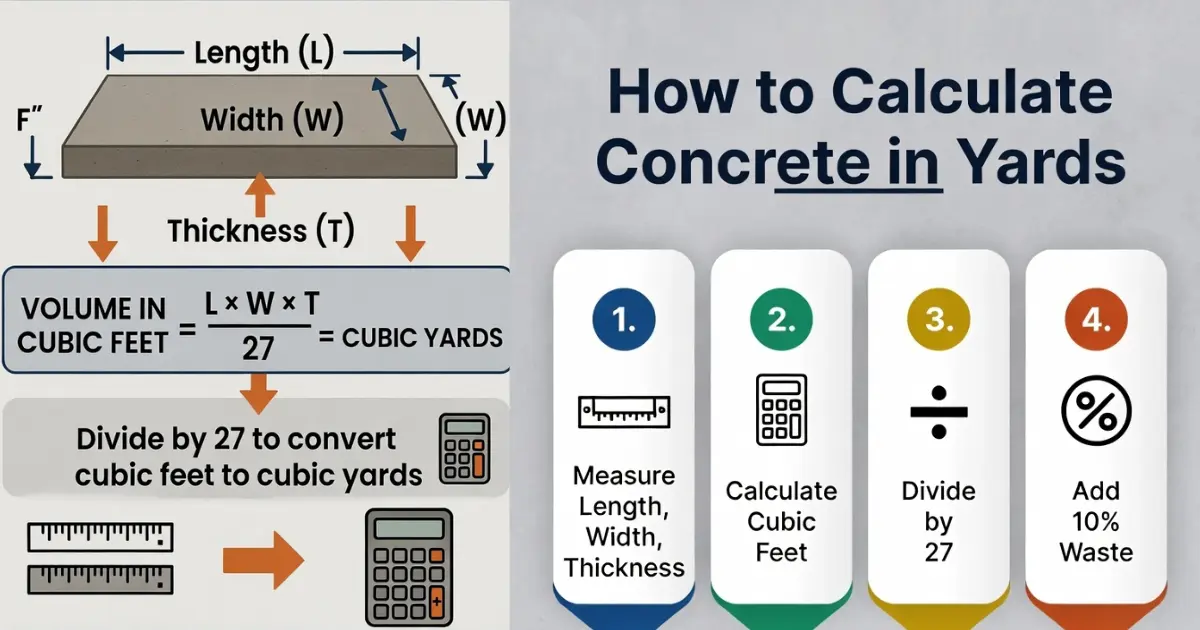
Volume (Cubic Feet) = Length × Width × Thickness (Feet)

Then convert cubic feet to cubic yards.

Cubic Yards = Cubic Feet ÷ 27

Example

  • Length = 12 ft
  • Width = 10 ft
  • Thickness = 4 inches (0.333 ft)

Volume = 12 × 10 × 0.333 = approx. 40 Cubic Feet
Cubic Yards = 40 ÷ 27 = approx. 1.48 Cubic Yards

Step 4: Choose Bag Size and Calculate Number of Bags

Now calculate the number of bags according to your bag size.

Bag SizeBags per Cubic Yard
80 lb45 Bags
60 lb60 Bags
40 lb90 Bags

If you have chosen 80 lb Bags:
1.48 × 45 = approx. 67 Bags

Step 5: Add Waste Allowance

In construction work, some concrete is always wasted, such as:

  • Loss during mixing
  • Uneven ground
  • Spillage
  • Measurement errors

That is why it is best to add 10–15% extra concrete bags to the final quantity.

Formula

Final Bags = Calculated Bags × 1.10 to 1.15

Example

  • Calculated Bags = 67
  • 10% Extra = 74 Bags
  • 15% Extra = 77 Bags

So for this project, buying approximately 75–77 Bags (80 lb) will be safe.

Final Quantity

Now you have the final number of concrete bags.

Quick Checklist
✅ Measure Length and Width correctly.
✅ Convert Thickness from Inches to Feet.
✅ Calculate Volume in Cubic Yards.
✅ Calculate number of bags according to bag size.
✅ Always add 10–15% Extra concrete at the end.

Practical Examples

Knowing the formula alone is not enough. In real construction work, the number of concrete bags changes according to different project sizes. The practical examples below will help you understand approximately how many bags are needed for different projects.

Note: All examples below use 80 lb Concrete Bags. If you use 60 lb or 40 lb bags, the number of bags will be higher.

Example 1: 10 × 10 Feet Slab (4 Inch Thick)

Suppose you are making a 10 ft × 10 ft concrete slab with 4-inch thickness.

Measurements

  • Length = 10 ft
  • Width = 10 ft
  • Thickness = 4 in (0.333 ft)

Calculation

  • Volume = 10 × 10 × 0.333 = 33.3 Cubic Feet
  • Cubic Yards = 33.3 ÷ 27 = 1.23 yd³
  • 80 lb Bags = 1.23 × 45 = approx. 56 Bags

With Waste
56 × 1.10 ≈ 62 Bags

Final Requirement: Approx. 60–62 Bags (80 lb)

Example 2: Small Driveway or Patio

Suppose your patio or driveway is 12 × 20 Feet and 4 Inch Thick.

Measurements

  • Length = 20 ft
  • Width = 12 ft
  • Thickness = 4 in

Calculation

  • Volume = 20 × 12 × 0.333 = 80 Cubic Feet
  • Cubic Yards = 80 ÷ 27 = 2.96 yd³
  • 80 lb Bags = 2.96 × 45 = approx. 133 Bags

With Waste
146 Bags

Final Requirement: Approx. 145–150 Bags (80 lb)

Example 3: Fence Posts / Footings

If you need to install 10 Fence Posts and each post hole is approximately 12 Inch Diameter × 24 Inch Depth.

For each hole:

  • 0.13 Cubic Yard
  • Approx. 6 Bags (80 lb)

For 10 Posts

  • 6 × 10 = 60 Bags

After adding waste:
Final Requirement: Approx. 65–66 Bags (80 lb)

Example 4: Repair Work (Steps, Sidewalk Patch)

Suppose you need to make a sidewalk patch that is 3 × 4 Feet with 4 Inch thickness.

Calculation

  • Volume = 3 × 4 × 0.333 = 4 Cubic Feet
  • Cubic Yards = 4 ÷ 27 = 0.15 yd³
  • 80 lb Bags = 0.15 × 45 = approx. 7 Bags

After adding waste:
Final Requirement: 8 Bags (80 lb)

This calculation is suitable for small repairs, steps, sidewalk patches, and crack replacement work.

Example 5: Garage Floor or Basement

Suppose the garage floor is 20 × 20 Feet with 4 Inch concrete thickness.

Measurements

  • Length = 20 ft
  • Width = 20 ft
  • Thickness = 4 in

Calculation

  • Volume = 20 × 20 × 0.333 = 133 Cubic Feet
  • Cubic Yards = 133 ÷ 27 = approx. 4.93 yd³
  • 80 lb Bags = 4.93 × 45 = approx. 222 Bags

With waste:
Final Requirement: Approx. 245 Bags (80 lb)

Quick Summary Table

ProjectApprox. Bags Needed (80 lb)
10 × 10 ft Slab (4″)60–62 Bags
Small Driveway / Patio145–150 Bags
10 Fence Posts65–66 Bags
Sidewalk Patch / Steps Repair8 Bags
20 × 20 ft Garage Floor240–245 Bags

When to Choose Bags vs Ready-Mix Concrete

Before buying concrete, it is equally important to decide whether to use concrete bags or order ready-mix concrete. Choosing the right option can save you time, effort, and cost.

When to Choose Concrete Bags?

Concrete bags are the best option for small and medium-sized projects. They can be easily stored and used one bag at a time as needed.

Choose Concrete Bags if:

  • ✅ Your project is small (less than approx. 1 Cubic Yard).
  • ✅ You only need to make a few fence posts, footings, steps, or sidewalk patches.
  • ✅ The work is in a place where a ready-mix truck cannot reach (inaccessible area), such as a backyard, garden, or narrow alley.
  • ✅ It is an emergency repair or you need to fix sudden concrete damage immediately.
  • ✅ You are doing a DIY project and want to mix concrete yourself.
  • ✅ You want to use only as much concrete as needed.

Advantages of Concrete Bags

  • Economical for small quantities.
  • Easy to carry and store.
  • Ideal for small repairs and DIY projects.
  • Mix only what you need, resulting in less waste.

When is Ready-Mix Concrete Better?

If your project is large, buying and mixing hundreds of bags and pouring them can be time-consuming and labor-intensive. In such cases, ready-mix concrete is a more convenient and effective option.

Choose Ready-Mix Concrete if:

  • ✅ Your project needs more than 1 Cubic Yard of concrete.
  • ✅ You are making a large slab, driveway, patio, garage floor, or basement floor.
  • ✅ You need to pour concrete over the entire surface at once in less time.
  • ✅ A large construction team or contractor is working.
  • ✅ You need consistent quality and strength of concrete.

Advantages of Ready-Mix Concrete

  • Saves time for large projects.
  • No need to mix hundreds of bags.
  • More consistent concrete quality.
  • Better finish for large slabs and driveways.

Bags vs Ready-Mix: Quick Comparison

FeatureConcrete BagsReady-Mix Concrete
Best ForSmall ProjectsLarge Projects
Concrete QuantityLess than 1 Cubic YardMore than 1 Cubic Yard
MixingYou have to do it yourselfComes pre-mixed
LaborMoreLess
CostEconomical for small jobsMore economical for large jobs
Ideal ProjectsFence Posts, Repairs, Steps, FootingsDriveway, Patio, Garage Floor, Basement, Large Slabs

Recommendation

If your project is small, the area is narrow, or you only need to do repair work, then concrete bags are the best choice.

But if you need more than 1 Cubic Yard of concrete or you are working on driveway, garage floor, patio, or large slab projects, then choosing ready-mix concrete is more practical, faster, and often more economical.

How Many Bags of Concrete in a Yard

How Many Bags of Concrete in a Yard | 80lb, 60lb, 40lb Bags Calculator

Concrete is widely used in home repairs, sidewalks, patios, fence posts, driveways, and both small and large construction projects. For large-scale jobs, ready-mix concrete is typically delivered by a concrete truck, while pre-mixed concrete bags are a more convenient option for small projects, DIY jobs, and repair work.

One of the most common questions homeowners and contractors ask is, How many bags of concrete are in a yard?” If you don’t calculate the correct number of bags, you may run out of concrete before finishing the job or end up buying more than you need, resulting in unnecessary costs and wasted material.

In this article, you’ll learn how many bags of concrete are in a cubic yard, how to calculate the number of bags based on different bag sizes (40 lb, 50 lb, 60 lb, and 80 lb), and practical tips to help you choose the right amount of concrete for your project.

How Many Bags of Concrete in a Yard Basic Information

Before calculating how many concrete bags are needed for 1 cubic yard, it’s important to understand the basics of cubic yards and concrete bags. This knowledge will help you estimate the correct amount of concrete more accurately.

1 Cubic Yard = 27 Cubic Feet

A cubic yard is the standard unit used to measure the volume of concrete.

It measures:

  • 3 feet long
  • 3 feet wide
  • 3 feet high

Therefore:

1 Cubic Yard = 3 × 3 × 3 = 27 Cubic Feet

This is why ready-mix concrete is sold and ordered in cubic yards.

Common Concrete Bag Sizes

Pre-mixed concrete is available in several bag sizes. The most common options include:

  • 40 lb (18 kg) Bag
  • 50 lb (23 kg) Bag
  • 60 lb (27 kg) Bag
  • 80 lb (36 kg) Bag

Since each bag produces a different amount of concrete, the number of bags required for 1 cubic yard varies depending on the bag size.

How Much Does One Cubic Yard of Concrete Weigh?

A typical cubic yard of ready-mix concrete weighs approximately 4,000 pounds (about 2 U.S. tons). However, the actual weight may vary slightly depending on the concrete mix design, aggregate type, and moisture content.

How Many Bags in One Yard?

If you plan to produce 1 cubic yard of concrete using pre-mixed concrete bags instead of ready-mix concrete, the number of bags required depends on the bag size. Larger bags produce more concrete, so fewer bags are needed.

80 lb Concrete Bags

One 80 lb concrete bag yields approximately 0.60 cubic feet of concrete.

Therefore:

27 ÷ 0.60 = Approximately 45 Bags

Answer: 1 Cubic Yard = Approximately 45 (80 lb) Concrete Bags

60 lb Concrete Bags

One 60 lb concrete bag yields approximately 0.45 cubic feet of concrete.

Therefore:

27 ÷ 0.45 = Approximately 60 Bags

Answer: 1 Cubic Yard = Approximately 60 (60 lb) Concrete Bags

40 lb Concrete Bags

One 40 lb concrete bag yields approximately 0.30 cubic feet of concrete.

Therefore:

27 ÷ 0.30 = Approximately 90 Bags

Answer: 1 Cubic Yard = Approximately 90 (40 lb) Concrete Bags

Comparison Table

Bag SizeApproximate Yield per BagBags Required for 1 Cubic Yard
40 lb0.30 Cubic Feet90 Bags
60 lb0.45 Cubic Feet60 Bags
80 lb0.60 Cubic Feet45 Bags

Keep in Mind

  • These values are approximate and may vary slightly depending on the manufacturer and product formulation.
  • For larger projects, it’s recommended to purchase 5%–10% extra bags to avoid running short during the pour.

Step-by-Step Calculation Method

If you want to determine how many concrete bags your project requires, first calculate the total cubic yards of concrete, then multiply that number by the number of bags required per cubic yard. Follow these simple steps.

Step 1: Calculate the Total Cubic Yards

Start by measuring the project’s:

  • Length
  • Width
  • Thickness (Depth)

Then use the following formula:

Concrete Yards = (Length × Width × Thickness) ÷ 27

Note: All measurements must be in feet. If the thickness is measured in inches, divide it by 12 to convert it to feet before using the formula.

Step 2: Multiply by the Number of Bags per Yard

Once you know the total cubic yards, multiply it by the number of bags needed for your chosen bag size.

  • 80 lb Bags = Concrete Yards × 45
  • 60 lb Bags = Concrete Yards × 60
  • 40 lb Bags = Concrete Yards × 90

This will give you the total number of concrete bags required.

Step 3: Add a Waste Allowance (10–15%)

Some concrete is typically lost due to spills, uneven surfaces, or minor measurement errors. For this reason, it’s recommended to purchase 10%–15% extra concrete bags.

Formula:

Final Bags = Calculated Bags × 1.10 (10% Waste Allowance)

or

Final Bags = Calculated Bags × 1.15 (15% Waste Allowance)

Example Calculations

Example 1: Concrete Slab

Slab Size: 20 × 15 Feet, 4 Inches Thick

  • Concrete Required = 3.67 Cubic Yards
  • 80 lb Bags = 3.67 × 45 = 165 Bags
  • Add 10% Waste = 165 × 1.10 = 182 Bags

Answer: Approximately 182 (80 lb) Concrete Bags

Example 2: Driveway

Driveway Size: 50 × 10 Feet, 6 Inches Thick

  • Concrete Required = 9.26 Cubic Yards
  • 80 lb Bags = 9.26 × 45 = 417 Bags
  • Add 10% Waste = 417 × 1.10 = 459 Bags

Answer: Approximately 459 (80 lb) Concrete Bags

Example 3: Small Repair

Repair Area: 4 × 4 Feet, 4 Inches Thick

  • Concrete Required = 0.20 Cubic Yards
  • 80 lb Bags = 0.20 × 45 = 9 Bags
  • Add 10% Waste = 9 × 1.10 = 10 Bags

Answer: Approximately 10 (80 lb) Concrete Bags

Bags vs. Ready-Mix Concrete – Comparison

When purchasing concrete, one of the biggest decisions is whether to use bagged concrete or ready-mix concrete. The best choice depends on your project’s size, budget, and timeline.

When Are Concrete Bags the Better Choice?

Concrete bags are ideal for small construction projects and repair work.

Choose bagged concrete if you are:

  • Building a small patio or sidewalk
  • Setting fence posts or deck posts
  • Repairing steps, floors, or concrete walls
  • Pouring less than 1 cubic yard of concrete
  • Working in an area where a ready-mix truck cannot easily access

Advantages

  • Easy to purchase in small quantities
  • Buy only the amount you need
  • Perfect for DIY projects and minor repairs
  • No minimum order requirements

When Is Ready-Mix Concrete the Better Choice?

Ready-mix concrete is the best option for medium to large construction projects.

Choose ready-mix concrete if you are:

  • Pouring a house foundation
  • Installing a large driveway or garage floor
  • Building a concrete slab
  • Working on commercial construction
  • Needing 1 cubic yard or more of concrete

Advantages

  • Professionally mixed to the correct proportions
  • Saves significant time on large projects
  • No on-site mixing required
  • Consistent quality and strength
  • Faster placement and finishing

Cost Comparison

FactorBagged ConcreteReady-Mix Concrete
Initial CostLowerHigher
Best for Small ProjectsMore Cost-EffectiveLess Cost-Effective
Best for Large ProjectsCan Become ExpensiveMore Cost-Effective
TransportationEasy to Transport YourselfRequires Truck Delivery

Note: For larger projects, ready-mix concrete is usually more economical on a per cubic yard basis than buying dozens of concrete bags.

Time & Labor Comparison

FeatureBagged ConcreteReady-Mix Concrete
Mixing TimeLongerMinimal
Labor RequiredHighLow
Pouring SpeedSlowerMuch Faster
Best for Large ProjectsNot RecommendedHighly Recommended
DIY ProjectsExcellent ChoiceLimited Use

Which Option Should You Choose?

Choose bagged concrete if:

  • Your project is small.
  • You’re making repairs.
  • You only need a limited amount of concrete.
  • You prefer a DIY approach.

Choose ready-mix concrete if:

  • Your project is large.
  • You need to save time and labor.
  • You require 1 cubic yard or more of concrete.
  • Consistent quality is important.

Tip: If your project requires about one cubic yard or more, ready-mix concrete is generally the better choice because it saves time, reduces labor, and is often more cost-effective.

Important Tips & Best Practices

Following these best practices will help you reduce waste, improve concrete quality, and complete your project more efficiently.

1. Always Buy Extra Bags (10–15%)

After calculating the required number of concrete bags, purchase an additional 10%–15% to account for spills, uneven surfaces, and minor measurement errors.

Example:

  • Required = 45 Bags
  • Add 10% Extra = Approximately 50 Bags

Having extra bags on hand helps prevent project delays caused by running out of concrete.

2. Mixing Ratio & Water Amount

Always follow the manufacturer’s recommended water amount printed on the concrete bag.

  • Too much water can reduce the concrete’s strength.
  • Too little water can make the mix difficult to work with.
  • Mix only the amount of concrete that can be placed within 30–60 minutes.

Following the recommended mixing instructions ensures maximum strength and durability.

3. Storage Tips (Protect Bags from Moisture)

Proper storage is essential to maintain the quality of bagged concrete.

  • Store bags in a dry, well-ventilated area.
  • Keep bags off the ground using wooden pallets or a raised platform.
  • Cover the bags with a plastic sheet or tarp.
  • Protect them from rain, humidity, and moisture at all times.

4. Shelf Life of Concrete Bags

When stored properly, most concrete bags have a shelf life of approximately 3 to 6 months.

If a bag contains hard lumps or the cement has hardened inside, do not use it, as this can significantly reduce the strength and quality of the finished concrete.

5. Safety Precautions

Always follow proper safety practices when mixing and handling concrete.

  • Wear protective gloves.
  • Use safety glasses to protect your eyes.
  • Wear a dust mask to avoid inhaling cement dust.
  • Avoid prolonged skin contact with wet concrete, as it can cause skin irritation or chemical burns.
  • Wash your hands and clean all tools thoroughly after completing the job.

Frequently Asked Questions (FAQs)

Why is it usually 45 bags of 80 lb concrete per yard?

One cubic yard contains 27 cubic feet of concrete. An 80 lb bag yields about 0.6 cubic feet of mixed concrete. So, 27 ÷ 0.6 = 45 bags.

How many 80 lb bags of concrete do I need for a 10×10 slab?

A 10 ft × 10 ft slab at 4 inches thick requires about 1.23 cubic yards. This equals roughly 55–60 bags of 80 lb concrete (including 10% extra for waste).

Can I mix multiple bag sizes together?

It is not recommended. Stick to one bag size (preferably 80 lb) for consistent strength and easier mixing.

How long do unopened concrete bags last?

Unopened bags typically last 6 to 12 months when stored in a dry place. Check for hard lumps before use — if the bag feels solid, the concrete has expired.

How to Calculate Concrete Yards

How to Calculate Concrete Yards

Accurately estimating the amount of concrete needed is essential for completing any construction project successfully, whether it’s a foundation, driveway, patio, sidewalk, slab, or road. Ordering too little concrete can delay your project, while ordering too much increases costs and leads to unnecessary material waste. concrete calculate

That’s why knowing how to calculate concrete yards is important for contractors, engineers, DIY homeowners, and anyone involved in construction. Accurate calculations help reduce costs, minimize waste, and ensure your project runs smoothly without interruptions.

In this guide, you’ll learn how to calculate concrete yards, understand the basic formula, follow a step-by-step calculation process, work through practical examples, and discover useful tips to improve accuracy.

What Is a Concrete Yard?

A concrete yard is the standard unit used to measure the volume of concrete. In construction, concrete is typically estimated and sold in cubic yards to determine the correct amount of material required for a project.

1 Cubic Yard = 27 Cubic Feet

A cubic yard measures:

3 feet × 3 feet × 3 feet

Therefore:

1 Cubic Yard = 3 × 3 × 3 = 27 Cubic Feet

This is why you divide cubic feet by 27 to convert the volume into cubic yards.

Why Is Concrete Measured in Cubic Yards?

Most ready-mix concrete suppliers sell concrete by the cubic yard. Since large construction projects such as foundations, driveways, slabs, sidewalks, and patios require significant amounts of concrete, the cubic yard has become the industry-standard unit for ordering ready-mix concrete.

Cubic Feet vs. Cubic Yards

Cubic FeetCubic Yards
Used for measuring smaller volumesStandard unit for measuring larger concrete volumes
Helps calculate construction volumeUsed when ordering ready-mix concrete
27 Cubic Feet = 1 Cubic Yard1 Cubic Yard = 27 Cubic Feet

Simply put, calculate the concrete volume in cubic feet first, then divide the result by 27 to convert it into cubic yards. This is the amount you’ll use when ordering ready-mix concrete.

How to Calculate Concrete Yards Basic Formula

To calculate concrete yards, you first need the length, width, and thickness (depth) of the area being poured.

Concrete Yard Formula

Concrete Yards = (Length × Width × Thickness) ÷ 27

All measurements should be in feet.

If the thickness is measured in inches, divide it by 12 to convert it into feet before using the formula.

Formula Explained

First, calculate the total volume in cubic feet.

Volume (Cubic Feet) = Length × Width × Thickness

Then divide the result by 27, since:

1 Cubic Yard = 27 Cubic Feet

The final result is the amount of concrete required in cubic yards.

Example

Suppose a concrete slab has the following dimensions:

  • Length = 20 ft
  • Width = 10 ft
  • Thickness = 6 inches (0.5 ft)

Volume = 20 × 10 × 0.5 = 100 Cubic Feet

Now convert to cubic yards:

Concrete Yards = 100 ÷ 27 = 3.70 Cubic Yards

Step-by-Step Calculation Guide

Follow these simple steps to accurately estimate the amount of concrete needed for any slab, driveway, foundation, patio, or other concrete project.

Step 1: Measure the Area

Measure the following dimensions:

  • Length (ft)
  • Width (ft)
  • Thickness/Depth (ft)

Note: If the thickness is measured in inches, divide it by 12 to convert it into feet.

Step 2: Calculate the Volume in Cubic Feet

Use the formula:

Volume (Cubic Feet) = Length × Width × Thickness

Example:

  • Length = 20 ft
  • Width = 10 ft
  • Thickness = 0.5 ft

Volume = 20 × 10 × 0.5 = 100 Cubic Feet

Step 3: Convert to Cubic Yards

Divide the cubic feet by 27.

Concrete Yards = Cubic Feet ÷ 27

Example:

100 ÷ 27 = 3.70 Cubic Yards

Step 4: Add 5%–10% for Waste

During construction, some concrete may be lost due to spillage, uneven ground, or leftover material in the forms. For this reason, it’s recommended to order 5%–10% extra concrete.

Example:

  • Calculated Amount = 3.70 Cubic Yards

Adding 10%:

3.70 × 1.10 = 4.07 Cubic Yards

Step 5: Round Up the Final Quantity

Always round your final result upward to avoid running short during the pour.

For the example above, you should order approximately 4.1 cubic yards of concrete.

Common Mistakes to Avoid

Even small mistakes when calculating concrete yards can result in higher costs, material shortages, or project delays.

1. Mixing Inches and Feet

One of the most common mistakes is using inches and feet together without converting the units.

Examples:

  • 4 inches = 0.33 ft
  • 6 inches = 0.50 ft
  • 8 inches = 0.67 ft

Using incorrect units will produce inaccurate concrete estimates.

2. Forgetting the Waste Factor

Many people order only the exact calculated amount of concrete.

However, some concrete is usually lost because of spillage, uneven subgrades, or leftover material in forms.

Always add 5%–10% extra concrete.

3. Measuring Irregular Shapes Incorrectly

L-shaped, circular, or irregular areas should never be measured as a single rectangle.

Instead:

  • Divide the area into smaller sections.
  • Calculate each section separately.
  • Add all the results together.

This provides a much more accurate estimate.

4. Using Old Measurements

Relying on old plans or estimated dimensions can lead to incorrect calculations.

Before ordering concrete:

  • Re-measure the length, width, and thickness.
  • Double-check all measurements, especially for large projects.

Useful Tips & Best Practices

1. Why Should You Order Extra Concrete?

Concrete may be lost during transportation, pouring, finishing, or because of uneven ground conditions.

Adding 5%–10% extra concrete is considered a best practice for most projects.

2. What Information Should You Provide When Ordering Ready-Mix Concrete?

When placing your order, provide:

  • Required quantity (Cubic Yards)
  • Concrete strength (PSI), such as 3000 PSI, 3500 PSI, or 4000 PSI
  • Slab or foundation thickness
  • Delivery date and time
  • Project location

Providing accurate information ensures you receive the correct concrete mix for your project.

3. Hot and Cold Weather Precautions

During Hot Weather

  • Concrete sets more quickly.
  • Begin curing as soon as possible.
  • Avoid leaving freshly poured concrete exposed to direct sunlight for long periods.

During Cold Weather

  • Concrete takes longer to cure.
  • Protect fresh concrete from freezing temperatures.
  • Follow proper cold-weather curing practices.

4. Use Online Calculators

If you prefer not to calculate manually, online concrete calculators can estimate concrete yards within seconds.

Most calculators offer:

  • Automatic cubic yard calculation
  • Unit conversion
  • Waste factor options
  • Support for slabs, footings, driveways, patios, and foundations
  • Mobile-friendly design

5. How to Estimate Concrete Cost

Use this simple formula:

Estimated Cost = Concrete Yards × Price per Cubic Yard

Example:

If your project requires 6 cubic yards and concrete costs $180 per cubic yard:

Total Cost = 6 × $180 = $1,080

Simply replace the price per cubic yard with your local concrete rate to estimate your project cost.

Tools & Calculators

Concrete yards can be calculated manually or by using digital tools. Both methods provide accurate results when the measurements are entered correctly.

Manual Method vs. Digital Calculator

Manual MethodDigital Calculator
Requires manual calculationsInstantly calculates results
Takes more timeFast and convenient
Higher chance of calculation errorsReduces human error
Unit conversions must be done manuallyAutomatic unit conversion
Best for small projectsSuitable for projects of all sizes

If you want faster and more accurate results, a digital concrete calculator is the better option.

Best Online Concrete Calculators

Many online concrete calculators allow you to enter the length, width, and thickness to instantly calculate the required cubic yards.

A good concrete calculator should include:

  • Automatic cubic yard calculation
  • Support for feet, inches, meters, and centimeters
  • Waste factor option
  • Calculations for slabs, driveways, foundations, patios, and footings
  • Easy to use on both desktop and mobile devices

Excel Formula

You can also calculate concrete yards in Microsoft Excel or Google Sheets.

Assume:

  • A2 = Length (Feet)
  • B2 = Width (Feet)
  • C2 = Thickness (Feet)

Formula:

=(A2*B2*C2)/27

To include a 10% waste allowance, use:

=((A2*B2*C2)/27)*1.10

This formula instantly calculates the required concrete yards while including the additional waste factor.

Frequently Asked Questions (FAQs)

What is the formula to calculate concrete yards?

The standard formula is: Cubic Yards = (Length × Width × Thickness) ÷ 27 All measurements should be in feet. Convert inches to feet by dividing by 12.

How much concrete is in 1 cubic yard?

1 cubic yard equals 27 cubic feet. At 4 inches thick, one cubic yard covers approximately 81 square feet.

How do I calculate concrete for a slab?

Measure the length, width, and thickness (in feet). Multiply them to get cubic feet, then divide by 27. Example: For a 20 ft × 15 ft slab at 4 inches (0.333 ft) thick = 3.7 cubic yards. Always add 5-10% extra for waste.

How much does one cubic yard of concrete weigh?

One cubic yard of concrete weighs approximately 3,800 to 4,000 pounds (about 1.9 to 2 tons), depending on the mix.

How to Calculate Yards of Concrete

How to Calculate Yards of Concrete

For any construction project such as a house foundation, driveway, patio, sidewalk, or concrete slab, estimating the correct amount of concrete is extremely important. If you order too little concrete, the work may stop midway. On the other hand, ordering too much concrete can lead to unnecessary expenses. Concrete Calculators

This is why concrete quantity calculation is considered an essential part of every construction project. In the concrete industry, volume is commonly measured in cubic yards because it is the standard and most convenient unit for large construction jobs.

In this article, you will learn what a cubic yard is, how to calculate concrete volume, and how to determine the amount of concrete needed for slabs, driveways, foundations, and other projects.

How to Calculate Yards of Concrete

To calculate concrete yards, you need the length, width, and depth of the area where concrete will be poured. Follow the steps below for an accurate calculation.

Step 1: Measure the Area Correctly

First, measure the dimensions of the area in feet.

  • Length = Length (ft)
  • Width = Width (ft)
  • Depth = Thickness/Depth (ft)

If the thickness is measured in inches, divide it by 12 to convert it into feet.

Step 2: Calculate Volume in Cubic Feet

Use the following formula:

Volume (Cubic Feet) = Length × Width × Depth

Example:

  • Length = 20 ft
  • Width = 10 ft
  • Depth = 0.5 ft (6 inches)

Volume = 20 × 10 × 0.5 = 100 Cubic Feet

Step 3: Convert Cubic Feet to Cubic Yards

Since:

1 Cubic Yard = 27 Cubic Feet

Use this formula:

Cubic Yards = Cubic Feet ÷ 27

Example:

100 ÷ 27 = 3.70 Cubic Yards

Step 4: Add a Waste Factor (5%–10%)

Some concrete is usually lost due to spillage, uneven surfaces, or other construction factors. Therefore, adding an extra 5%–10% is recommended.

Example:

3.70 × 1.10 = 4.07 Cubic Yards

Step 5: Determine the Final Quantity

Round up the final result to ensure you do not run short during the project.

In the example above, you should order approximately 4.1 Cubic Yards of concrete.

Basic Formula

The most commonly used formula for calculating concrete yards is:

Cubic Yards = (Length × Width × Thickness) ÷ 27

Where:

  • Length = Length (in feet)
  • Width = Width (in feet)
  • Thickness = Depth/Thickness (in feet)

Why Is 1 Cubic Yard Equal to 27 Cubic Feet?

A cubic yard measures:

  • 3 feet long
  • 3 feet wide
  • 3 feet high

Therefore:

3 × 3 × 3 = 27 Cubic Feet

This is why cubic feet are divided by 27 to convert them into cubic yards.

Understanding the Formula in Simple Terms

First, multiply the length, width, and thickness to find the total volume in cubic feet. Then divide the result by 27 to get the volume in cubic yards.

Example:

  • Length = 20 ft
  • Width = 10 ft
  • Thickness = 0.5 ft

Cubic Yards = (20 × 10 × 0.5) ÷ 27

= 100 ÷ 27

= 3.70 Cubic Yards

This means approximately 3.7 cubic yards of concrete are required for the slab.

Unit Conversion Tips

To calculate concrete accurately, all measurements should be converted into the same unit, preferably feet.

How to Convert Inches to Feet

If thickness is given in inches, divide it by 12.

Feet = Inches ÷ 12

Examples:

  • 4 inches = 4 ÷ 12 = 0.33 feet
  • 6 inches = 6 ÷ 12 = 0.50 feet
  • 8 inches = 8 ÷ 12 = 0.67 feet

Converting Centimeters and Meters to Feet

  • 1 Meter = 3.281 Feet
  • 1 Centimeter = 0.0328 Feet

Examples:

  • 2 meters = 2 × 3.281 = 6.56 feet
  • 30 cm = 30 × 0.0328 = 0.98 feet

Calculating Circular Areas

For a circular area, first calculate the area:

Area = 3.14 × Radius × Radius

Then:

Volume = Area × Thickness

Finally, divide the volume by 27 to get cubic yards.

Calculating L-Shaped Areas

For an L-shaped area:

  1. Divide it into two rectangles.
  2. Calculate the area of each section separately.
  3. Add both areas together.
  4. Multiply the total area by the thickness.
  5. Divide the volume by 27 to get cubic yards.

Calculating Irregular Shapes

Break irregular areas into smaller rectangles, squares, or circular sections. Calculate each area separately, add them together, and then multiply by the thickness to find the total volume. Divide by 27 to obtain cubic yards.

Tip: For complex or irregular designs, add an extra 5%–10% concrete to avoid shortages.

Recommended Thickness for Different Projects

Different construction projects require different concrete thicknesses. The table below shows commonly recommended thicknesses.

ProjectRecommended Thickness
House Slab / Flooring4–6 Inches
Driveway4–6 Inches
Garage Floor5–6 Inches
Sidewalk4 Inches
Foundation / Footing8–12 Inches (or as designed by an engineer)
Patio / Porch4 Inches

Important Considerations

  • If heavy vehicles will use the driveway, a thickness of 6 inches or more is recommended.
  • Garage floors may require additional thickness for trucks or heavy equipment.
  • Foundation and footing thickness depend on soil conditions, building loads, and local building codes.
  • A 4-inch thickness is generally sufficient for patios, porches, and sidewalks.

Always check local building codes and engineering requirements for the best results.

Common Mistakes to Avoid

Even small calculation errors can result in extra costs or material shortages. Avoid the following common mistakes.

1. Mixing Units (Inches vs Feet)

One of the most common mistakes is mixing inches and feet in calculations. Always convert inches into feet before calculating.

Examples:

  • 6 Inches = 0.5 Feet
  • 4 Inches = 0.33 Feet

Using incorrect units can significantly affect the final result.

2. Not Adding a Waste Factor

Many people order concrete based only on the calculated quantity. However, some material is usually lost during construction.

For this reason, it is recommended to add 5%–10% extra concrete.

3. Incorrectly Measuring Irregular Shapes

Treating L-shaped, circular, or irregular areas as a single shape often produces inaccurate results.

A better approach is to:

  • Divide the area into smaller sections.
  • Calculate each section separately.
  • Add the results together.

4. Relying on Old Measurements

Old drawings, estimated dimensions, or previous measurements may not always be accurate. Site conditions can change over time.

Before ordering concrete:

  • Re-measure the length, width, and thickness.
  • Double-check measurements for important projects.

Accurate measurements and proper unit conversions are the keys to determining the correct amount of concrete, saving both time and money.

Modern Tools & Calculators

Online Concrete Calculators

Today, manual calculations are no longer necessary for estimating concrete volume. Various online concrete calculators can provide accurate concrete yard estimates within seconds.

Typically, you only need to enter:

  • Length
  • Width
  • Thickness/Depth
  • Measurement Unit (Feet, Inches, Meters, etc.)

The calculator will automatically determine the total volume in both cubic feet and cubic yards. Many modern calculators also include a waste factor option to help prevent shortages.

Benefits of Online Concrete Calculators

  • Fast and easy calculations
  • Reduced human errors
  • Automatic unit conversions
  • Waste factor adjustments
  • Suitable for slabs, driveways, patios, footings, foundations, and more

If you want quick and accurate results, using an online concrete calculator is the most convenient solution.

How much concrete is in one cubic yard?

One cubic yard of concrete equals 27 cubic feet of concrete.

How much concrete is needed for a 4-inch slab?

To determine how much concrete is needed for a 4-inch slab, you need the slab’s length and width.

How much waste allowance should be kept?

When ordering concrete, it is recommended to add a waste allowance of 5% to 10% to your calculated quantity.